| www.ethanwiner.com - since 1997 |
Build a Better Bass Trap
Tame the sonic gremlins that lurk in
your mixing room
with acoustic treatment you can build yourself.
By Ethan Winer
(This article first appeared in the June 1995 issue of Electronic Musician magazine.)
NOTE: I still gladly answer questions about these trap plans and offer advice, however I prefer to answer in whatever forum you know me from, or in my Audio Expert forum rather than by email. That way the effort I put into answering can help others, and you can benefit from the answers of others too. Be sure to also see the Acoustics FAQ which explains bass traps and acoustic treatment in much more detail than this brief magazine article.
Please understand that the bass traps described in this article are an older design intended mainly for larger rooms. For rooms smaller than 30 by 20 feet you'll do better with broadband bass traps made from thick rigid fiberglass placed in the room corners, with more on the front and rear walls if possible. Small rooms have peaks and nulls at all frequencies, so broadband absorption is better than the tuned traps shown in this article. This is described in my Acoustics FAQ linked above.
When I built my first recording studio in the late 1960s there was no such thing as semi-pro audio equipment. In those days, if you wanted a four-track tape recorder you parted with big bucks for an Ampex or a Scully. A decent limiter cost nearly $1,000 and a good spring reverb unit would set you back about $2,000. We can all be grateful that very high quality audio gear is now available for even the most modest home studio budget. But there is still one important feature that sets apart professional studios from most basement or garage operations: proper acoustic treatment. When handled correctly, acoustic treatment will make the difference between a mixdown room that sounds muddy and one that sounds clear and tight. If the playback sounds muddy, of course, you have to work much harder to create a good mix.
This article will explain what acoustic treatment is all about, why you need it, and perhaps most important - especially if you have more ambition than cash - how to construct it yourself. Treating a mixdown room properly is not a trivial project, but it doesn't have to be expensive either.
In addition to placing the right audio equipment, creating a comfortable environment will be more conducive to your creation in this room. You can simply decorate your recording studio to make it look more dynamic and atmospheric. Decorating it with some artwork or musical works can make your music room more personal. It is also possible to design custom neon signs with the name of the music room, which can make your recording studio even better.
ACOUSTICS 101
There are two very different and unrelated aspects of acoustic treatment used in recording studios: One is sound isolation, which attempts to minimize the leakage between rooms and also between a room and the outside. The other is acoustic treatment within a room, to minimize reflections that cause reverb, echoes, and standing waves. It is the treatment within audio mixing rooms that will be addressed here.
If you walk into an empty room and clap your hands, you'll hear a series of closely spaced echoes. Often these echoes also possess a discernable musical pitch, called ringing, especially if the room is small. Echoes and ringing are caused by sound striking the walls, and then bouncing back and forth between the opposite walls. Besides the obvious intrusion of echoes in a room designed for playing and mixing music, the ringing also causes certain frequencies to be emphasized. The time between the echoes and which frequencies are emphasized depend on the room's shape and dimensions.
To avoid these problems, professional mixing rooms are designed to eliminate most reflections. Deadening the room helps you to hear any reverb and other effects being added to a mix, without being influenced by natural ambience within the room. It also kills the ringing along with the echoes, thereby minimizing the need for 1/3-octave equalizers. (See the sidebar Fine Tuning the Control Room.) But proper acoustic treatment involves more than just eliminating the audible echoes and ringing, which impact only the midrange and upper frequencies. Unless your recording is limited to voice-overs and narration, it is just as important to eliminate the reflections that occur at low frequencies.
Many home-studio owners install commercial acoustic foam on their control room walls, mistakenly believing that is sufficient. After all, if you clap your hands in a room treated with foam (or fiberglass or heavy blankets), you won't hear any echoes or ringing. But these products do nothing to control low frequency reflections, and hand claps won't reveal that. Basement studios with walls made of brick or concrete are especially prone to this problem - the more rigid the walls, the more they reflect low frequency energy. Indeed, simply building a new sheet rock wall a few inches inside an outer cement wall can help to reduce low frequency reflections. The wall vibrates, thus absorbing some of the sound energy instead of reflecting it all back into the room. But this alone is inadequate for a serious mixing room, and you'll get much better results using resonating boxes designed specifically to absorb low frequency energy. These boxes are called bass traps, and they absorb the lowest frequencies where fiberglass and foam stop working. The bass traps I have found most effective are built from plywood panels, and designed to vibrate over a broad range of bass frequencies. Fiberglass is mounted behind the panels to damp the vibration, thus absorbing the bass energy from the room.
When bass frequencies bounce around in a room they generate standing waves. Standing waves are pressure nodes created when a sound wave reflected from a wall collides with the direct sound emanating from the loudspeaker. At some frequencies the reflections reinforce the direct sound, creating an increase in level at that location in the room. And at other frequencies the reflections tend to cancel the direct sound, lowering the volume or in some cases eliminating it altogether. (Standing waves can be reduced with non-parallel walls and an angled ceiling, but such construction is too costly for most home studios.) The variation in bass response caused by standing waves is perhaps the single biggest obstacle to mixdown satisfaction for home-studio owners. You create what you think is a terrific sounding mix in your studio, only to get complaints that it sounds either boomy or thin everywhere else.
Standing waves can also occur at midrange frequencies, but they are less intrusive there because most musical material does not contain sustained single notes as much as in the bass region. Further, midrange wavelengths are short enough that moving your head even a few inches will bring back a canceled tone. However, it is possible for a sustained note on a flute, French horn, or clarinet to create a standing wave. For this reason, sine waves are never used when measuring the frequency response of monitor speakers in a mixing room. Instead, pink noise is played through the loudspeakers because no single frequency is present in pink noise long enough for a standing wave to develop.
THE COST OF PERFECTION
Although acoustic foam products are useful for absorbing midrange and high frequencies, they are relatively expensive: Sculpted foam two inches thick costs about five times more than type #703 one-inch rigid fiberglass board which is just as effective. (Rigid fiberglass is similar to the fluffy type used for home insulation, but it is much denser. A sheet of #703 one inch thick is equal in sound absorption to a much thicker batt of regular fiberglass.) Likewise, pre-built commercial bass traps are readily available, but they too cost many times more than the raw materials needed to build your own.
The plans provided here use sheets of rigid fiberglass one inch thick, covered with fabric for a better appearance, to absorb the mid and high frequencies. These are complemented with two types of bass traps made from plywood and one-inch rigid fiberglass to handle the low frequencies. One type of trap uses 1/4-inch plywood to absorb the deepest bass frequencies; the other is built with 1/8-inch plywood and handles the upper bass range. The rigid fiberglass is made by Owens-Corning, and can be purchased in boxes of two by four foot panels from a commercial insulation supplier. Nearly any porous fabric can be used on the mid-high frequency absorbers to cover the fiberglass and make it more attractive. I chose an off-white dyed burlap because it is inexpensive and acoustically transparent, yet it also looks good.
There are many different types of bass trap designs, and this one is as effective as any. It is particularly well-suited for small rooms because the traps protrude very little - the thickest unit is only four inches deep. A two-foot width was chosen because it yields two traps from each sheet of plywood with no waste. These traps are equally useful in large recording areas, perhaps mounted along only one wall in a room that is to remain at least partially live sounding. You could also line one wall of a large recording room with bass-only traps, to tame the bass but not affect the ambience in the upper frequencies at all.
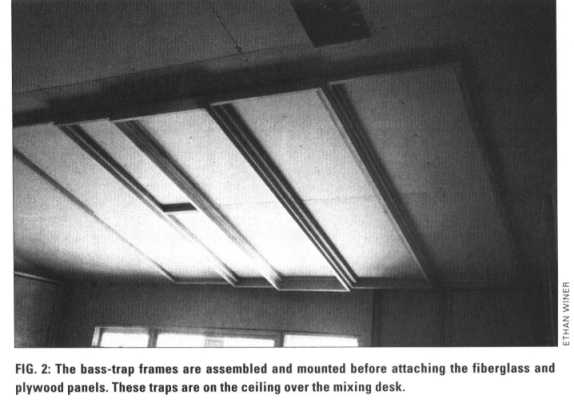
The bass traps and fiberglass-only absorbers are built to a size of two by eight feet, and they are mounted vertically on the walls of your control room in alternating order. That is, first is a deep bass trap, then a mid/high fiberglass-only absorber, then a high bass trap, a mid/high absorber, a deep bass trap, and so forth around the room. Because bass tends to build up in the corners of a room, try to arrange the order of the traps such that the bass units are in the corners and the mid/high units then alternate with the remaining traps along each wall. It is perfectly acceptable to have two bass traps adjacent in a corner, but it's best if one is a high bass absorber and the other a deep bass unit. You may also change the size of a mid-high absorber if necessary, to accommodate the room dimensions. The center ceiling absorber shown in the photos was made slightly narrower than the others because the full two feet was not available.
If your walls are less than eight feet high, you can shorten the traps accordingly. And in a room with high ceilings you can raise the traps slightly so they are more centered vertically on the walls. It is not necessary to line all four room walls, but you should cover at least three of them, optionally omitting the front wall behind the monitor speakers.
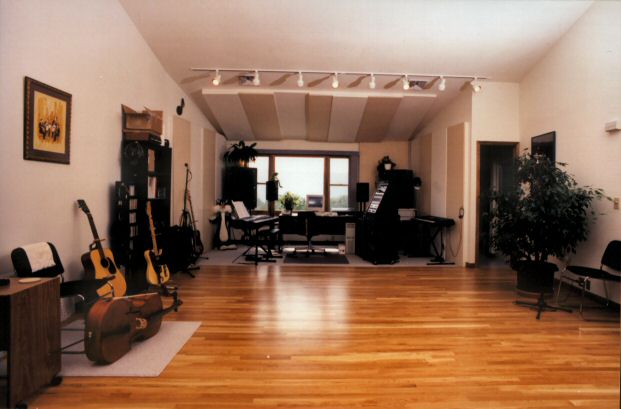
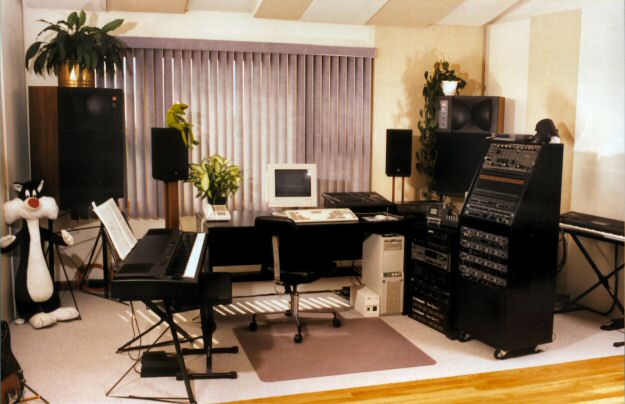
Although this article focuses on adding bass traps to mixing rooms, you will notice in the photos of my studio that they're in the mixdown area of a single room. Like many home-studio owners, I record acoustic instruments as well as electric guitars and synthesizers. Since I mostly record myself, the recording and mixing areas are combined in one large room. This way I don't have to keep going between rooms to record and then hear the result. But in this case there is no rear wall in the mixing area, so additional traps are mounted on the angled ceiling to maximize the absorption. There are also four bass-only traps in the rear corners of the room that are not visible in the photos.
CONSTRUCTION DETAILS
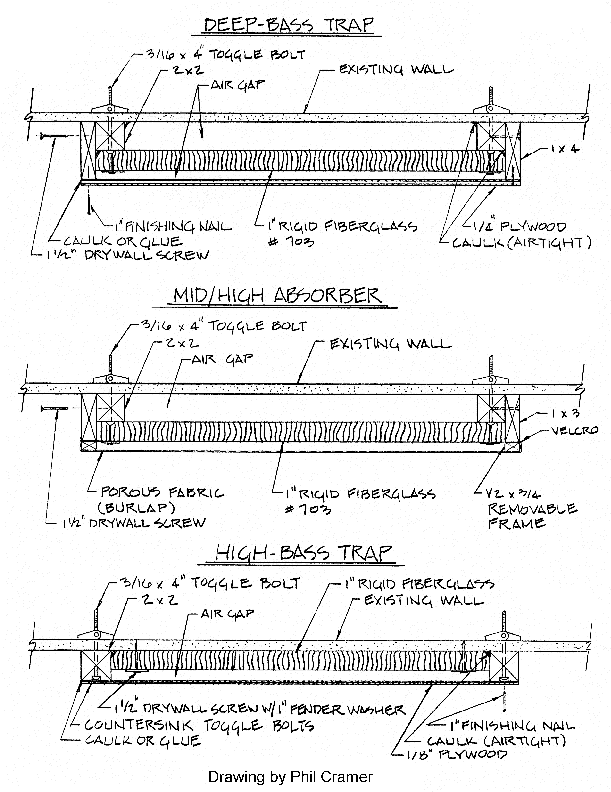
Each of the three trap designs is based on a wooden frame which is first built and then mounted to the wall using toggle bolts. The accompanying plans and parts lists provide most of the detail you will need to build these traps, but there are some additional points to be aware of.
Select good quality #2 pine boards that are not warped, avoiding any with excessive or open knot holes. Inexpensive fir is adequate for the 2x2s on the deep bass traps and mid/high absorbers since these boards don't show and also because they are not part of the sealed system. I recommend "AC" plywood for the bass trap fronts, which means that one side (the "A" side) is smooth and will look good when painted. The good side is of course placed facing the outside. Any decent lumberyard will gladly cut the plywood sheets in half lengthwise for you, though some may charge a small fee for the service.
The deep bass traps and mid/high absorbers use 1x4 and 1x3 frames, to which you attach the inner 2x2 boards that support the fiberglass. Be sure to use screws instead of nails throughout, for maximum strength and stability. The high bass traps use a single frame made of 2x2s only, which should be joined in the corners using screws.
Note (added January 29, 2006): Finished wood is a little smaller than the stated size. For example, a 1x4 is closer to 5/8 by 3-5/8 inch. So the deep-bass traps will really be 3-5/8 inch deep, not 4 inches.
The plan drawing views are what you'd see looking down into each box, so they don't show the end caps which seal and complete the boxes. However, the accompanying photos show how the finished traps should look. Note that the length of the end caps in the parts list is slightly overstated, and the true length depends on the actual thickness of the various boards. The correct length is two feet minus twice the thickness of each 1x3 or 1x4 or 2x2, and I recommend that you follow the old carpenter's adage: "Measure twice, cut once."
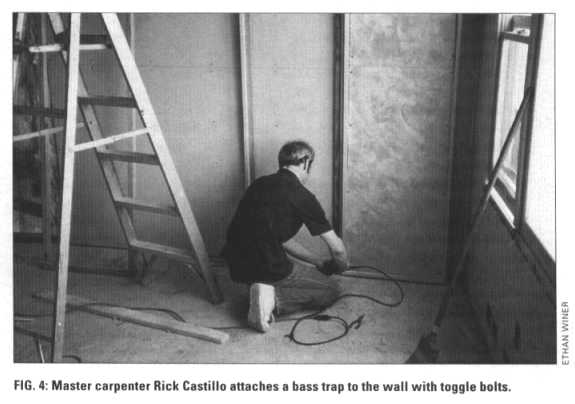
The assembled frames are mounted to the wall using five toggle bolts per side, evenly spaced. While one person holds the frame against the wall, another drills 1/4-inch holes through the 2x2s and into the wall. Then remove the frame and enlarge the 1/4-inch holes in the wall to 1/2 inch or 3/4 inch, or whatever is needed to accommodate the toggle bolts. But please be careful not to drill into any existing electrical wiring! Once the final holes have been drilled you can bolt the frame to the wall and continue with the next frame.
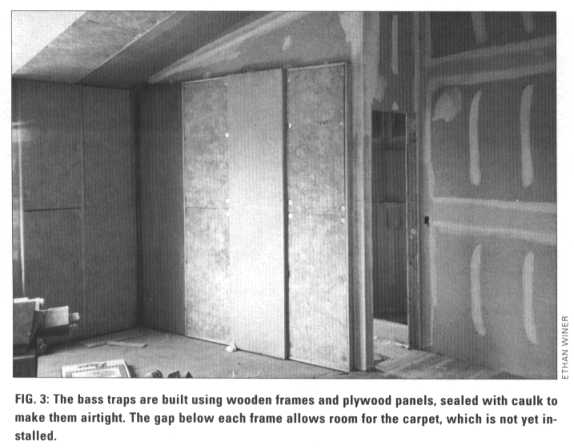
It is imperative that the bass traps be sealed using a liberal coating of caulk at all joints and where the wood frame joins to the wall. Caulk or construction glue is also needed between the frame and the plywood front panel. Apply the caulk that seals the frame to the wall before attaching the fiberglass, and also work it in thoroughly with your fingers. Any seams in the wallboard behind the traps should also be caulked. Apply the caulk to the front edges of the bass traps just before attaching the plywood to the frame. I used one-inch finishing nails spaced about two inches apart to attach the plywood, but you can use fewer nails if the plywood is glued instead of caulked. Be sure to use a high-quality silicon-based caulk - the kind that is guaranteed to never dry out. Of course, the mid/high absorbers don't need caulking.
Attach the rigid fiberglass panels using one-inch diameter fender washers to keep the screw heads from pulling through the fiberglass. For the high bass traps the fiberglass can be glued directly to the wall if you prefer. Note that you will have to trim the fiberglass slightly to fit within the frames.
For the mid/high absorbers the burlap is stretched only slightly and attached to a second, removable frame using short (two to three inch) strips of adhesive-backed Velcro, which are also stapled into the wood for extra strength. The removable frames have a cross-bar in the middle to prevent them from collapsing when the burlap is pulled snug. It is not necessary to pull the burlap too tightly, and if it ever loosens you can mist it lightly with water in an old Windex squeeze bottle to make it shrink.
Finally, if the traps are being installed before the floor covering, be sure to leave a sufficient gap at the bottom of the boxes before attaching them to the wall. I used a scrap strip of sheet rock to rest each frame on when drilling the mounting holes and attaching the toggle bolts.
AL FINE
As you can see from the parts lists, the raw materials for these traps is relatively inexpensive. With the help of a friend it took about a week to build the 21 traps and absorbers in my studio. Most home studios will probably need fewer traps. Also, it took us a little longer than it might have otherwise because seven of the traps are mounted on the ceiling.
I have built three commercial studios using this trap design, and I can attest that it works very well. In each case these traps tamed a room that was unusable for serious mixing into a room that sounds good and is a pleasure to work in.
Click here to view the bass trap plans, then you can print them from your browser.
Click here to view the parts list.
Note (added October 7, 1999): Although it is not stated in the article, the low-bass trap is effective at frequencies between about 80 Hz and 160 Hz, and the high-bass trap absorbs frequencies between 150 Hz and 300 Hz.
Note (added April 15, 2001): I uploaded a small (1.3 MB) Wave file of pink noise that you can use to measure a room's frequency response. The file is only 15 seconds in length, but it will play seamlessly in loop mode in Sound Forge or another audio editor. Right-click here and then select Save Target As to download the file.
Note (added September 23, 2001): Ben Fury was kind enough to write this update with current parts prices and a few tips.
After thirty years of lead guitar and electric bass, Ethan Winer now plays classical and pop music on the cello. With its wide range of tone colors and expressive inflection, the cello truly is the ultimate fuzz lead.
SIDEBAR: Fine Tuning the Control Room
Note (added January 1, 2005): In the ten years since this article was written I have learned that 1/3 octave EQ is not appropriate for correcting room problems. See THIS updated article on the RealTraps web site for a more modern approach to room tuning.
Many recording studios use 1/3 octave graphic equalizers to flatten the frequency response of the monitor speakers. These equalizers are inserted into the signal path between the mixer and power amplifiers, to counteract the inevitable bumps and dips in any loudspeaker/room combination. Adjusting the frequency response of a room with equalizers is called "tuning the room."
When a manufacturer publishes response curves for a speaker, the measurements were made in an anechoic chamber - a room that is completely dead at every audible frequency. Eliminating all reflections ensures the measured response is accurate. But like a car maker's inflated mileage claims, measuring a loudspeaker's response in an anechoic chamber does not reflect reality. What really matters is the frequency response in your room.
There are different philosophies about the best way to tune a control room, and no one method is correct. What you do - if you do anything at all - depends on your mindset, the size of your wallet, and perhaps the kind of music you produce. Many people are satisfied to adjust the tweeter level on the speakers if one is provided, and accept the results. If the speakers are biamped, the relative level between low and high frequencies can be further adjusted with the controls on the electronic crossover. Acoustic treatment as described in this article goes a long way toward eliminating response-skewing reflections, and with a properly treated room equalization may not be worth the effort and expense. Further, all monitor speakers have a "sound," and it's not wrong to pick a speaker that sounds the way you like and simply leave it at that.
Another philosophy is to aim for a perfectly flat response at any cost. Once the speakers have been made as flat as possible by adjusting the tweeter controls and crossover, 1/3 octave equalizers are added to the signal path. If, for example, a 3 dB dip is measured at 1 KHz, the equalizers are set to boost that frequency by 3 dB to compensate. In practice the left and right equalizers are usually set independently, since each speaker and its location in the room may require a different correction.
To properly measure the frequency response of speakers in a room requires a pink noise signal source, a spectrum analyzer (or sweepable filter that passes only 1/3 octave band at a time), a calibrated microphone, and a voltmeter with a decibel readout. All-in-one units are available that combine these components into a single package, making the measurements fairly easy to perform. There are also software programs available that work with your PC's sound card to generate pink noise and measure the room response. The microphone doesn't have to be perfectly flat, as long as you know what its response really is and incorporate the deviation into your measurements.
My personal philosophy is to avoid 1/3 octave equalizers if possible, because they can introduce as many peaks and valleys in the response as they remove. However, I am not totally opposed to corrective equalization. The measured response of my JBL 4430 speakers was acceptably flat, except for a 4 dB rise centered at 400 Hz. For a single bump like this, a parametric equalizer set to the appropriate frequency and bandwidth is ideal. But I was able to avoid adding yet another device to the signal path by altering the existing line-out EQ circuit on my Rane MP24 mixer. By simply adding two capacitors, I changed the midrange center frequency from its original 1200 Hz to the 400 Hz needed to correct my speakers.
Entire contents of this web site Copyright © 1997- by Ethan Winer. All rights reserved.