| www.ethanwiner.com - since 1997 |
Using a Mixer With a DAW
by Ethan Winer
This article first appeared in the March 2003 issue of EQ magazine
Ethan's new book
The Audio Expert explains |
One of the most frequent questions I see in the audio newsgroups asks how to connect a mixer to a computer-based recording setup. Many people have a small mixer, like the Mackie 1402, and want to record basic tracks first and then add overdubs later. The Mackie manuals show several setups for combining musical instruments and other sources to play them through loudspeakers. But they ignore what may be the most common setup of all - a typical digital audio workstation (DAW). This article explains the basic principles of recording in a DAW and shows the best way to connect the various components through a small mixer. I will use the Mackie 1402 VLZ for these examples, but the concepts apply to any mixer that offers an insert point for each preamp output.
With most DAW setups, it's best to record each instrument and microphone on a separate track. This gives the most flexibility when mixing, letting you change the volume and equalization separately for each sound source, add more or less reverb to just that instrument, and so forth. I also suggest that you do all mixing within the DAW program using the software's volume, pan, and plug-in effects, rather than sending individual tracks to a hardware mixer. Mixing in a DAW is more flexible because it allows the mix to be automated and recalled exactly. It also ensures that when you export the song to a stereo Wave file, it will sound the same as what you heard while mixing.
INPUTS AND OUTPUTS
Most small mixers contain two independent sections: an input section and a mixer section. The input section contains the input connectors (XLR and 1/4-inch) and the preamps, which raise the small input signals to line level so they're suitable for recording. The mixer section then combines all of the preamplified inputs into one stereo mix that you can play through loudspeakers or headphones. It's important to understand the difference between the input channels, which are available independently, and the combined stereo mix. You'll record each sound source through the preamps to a separate input of your sound card, but you also need to monitor all the channels mixed together to hear yourself as you play or sing, and to hear the tracks already recorded.
The first step is to route each microphone or instrument to a separate input on the sound card. If you have only one stereo sound card, you can record only one stereo source at a time, or optionally two mono sources. (Of course, you can record any number of additional tracks later as overdubs.) If you have a multi-channel sound card, you can record as many separate tracks as the sound card has inputs. However, you should play all tracks through one output, even if your sound card has several outputs. This way the mix is controlled entirely by the settings in your DAW program, independent of the knobs on the hardware mixer.
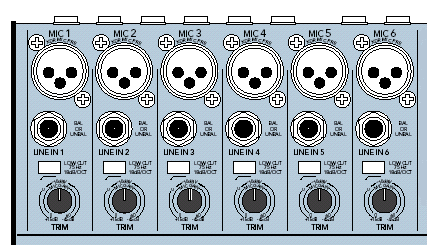
Figure 1: The 1402's Front Panel Input Section
Figure 1 shows the input section of a Mackie 1402 VLZ mixer. You can connect either XLR microphone or 1/4-inch instrument cables, which go through the 1402's preamps and then to the mixer section that combines the inputs. The channel insert portion of the 1402 back panel is shown in Figure 2 below, and this is where you'll connect each preamp output to one input of your sound card. The original purpose of an insert point was to insert a hardware effect box, such as a compressor, into the recording chain. But with a DAW, you can do that with plug-ins later. For our purposes, the insert point will serve as a splitter to send the preamplified input to the sound card while also sending it to the rest of the mixer for monitoring. When an output is taken from the insert point, it's called a direct out because the signal is taken directly from the output of the preamp, before passing through the mixer's volume and tone control circuits.
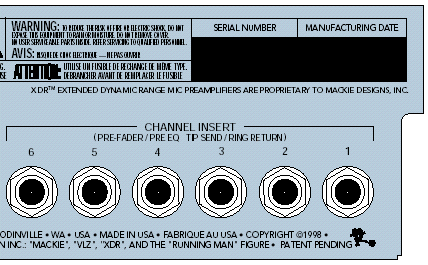
Figure 2: The 1402's Back Panel Insert Points
With nothing plugged into an insert jack, the output of the preamp goes through the channel volume, pan, and EQ controls on the front panel and is combined in the mixer section with the other preamp outputs. But when you insert a 1/4-inch plug only partway into the jack, the output of the preamp is sent to the inserted plug and also goes to the rest of the mixer. This is the key to recording each source to a separate track. Since the preamp output still goes to the mixer section, you can control how loudly you hear the source through your speakers with that channel's volume slider. And since each preamp output goes directly to the sound card, it's the only thing recorded on that track. If you were to record from the mixer's main output, the new recording would include all the tracks already recorded as well as inputs intended for other tracks.
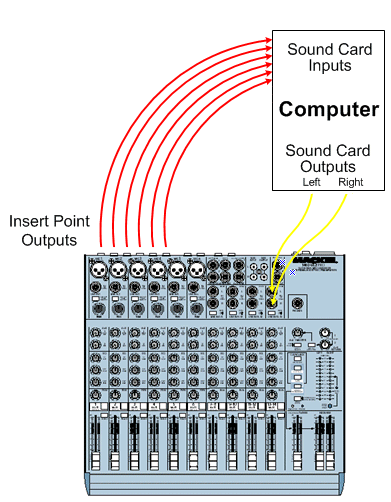
Figure 3: Connecting it all together - be sure to push the plugs only partway into the insert point jacks!
Figure 3 shows how each channel's insert point output goes to one input of the sound card. The sound card's main stereo output then goes to one of the mixer's stereo inputs so you can hear your recording program's playback. This way you can control the volume you hear for each track being recorded with its input channel volume slider, and control the playback volume of tracks already recorded with the stereo channel's slider. In this example, mixer channels 1 through 6 control how loudly you hear each source being recorded, and stereo input pair 13-14 controls how loudly you hear the tracks already recorded.
SETTING RECORD LEVELS
Each of the six input channels has two volume controls: the preamp gain knob (also called Trim) and the channel volume slider. Both affect the volume you hear through the loudspeakers, but only the preamp gain changes the recording level sent to your sound card. Therefore, when recording, you must first use the preamp gain control to set a suitable recording level, then adjust the channel slider for a comfortable volume through the loudspeakers or headphones. Since the channel volume slider and equalizer are not in the path from preamp to sound card, you can freely change them without affecting the recording.
MONITORING WITH EFFECTS
It's often nice to hear a little reverb when recording yourself singing or playing, for extra inspiration and to get a sense of how it will sound in the final mix. Many DAW programs let you monitor with reverb and other software effects while recording, but I usually don't recommend that. One problem with monitoring with effects is the inherent delay through the program and plug-ins, especially with slower computers. Another problem is that the effects tax the computer more than recording alone. If your computer can just barely record eight tracks at once and you monitor with effects while recording, you may end up with gaps in the recorded audio or the program might stop suddenly. Fortunately, most small mixers, like the 1402, have Aux busses where you can patch in a hardware reverb. Any reverb you apply on an Aux buss affects only the monitoring path and is not recorded. Therefore, you can hear yourself sing (using earphones) with all the glory of a huge auditorium, and defer the amount of reverb until you make the final mix. Better, since reverb on an Aux buss is not recorded, an inexpensive unit is adequate.
Likewise, I recommend recording without EQ or compression effects. With analog tape, the hiss is always a problem; in the old days it was common to add treble boost or compression while recording if you knew those would be needed later. But modern digital recording - even at 16 bits - has a very low noise level so recording with effects is not needed. More important, it's a lot easier to experiment or change your mind later if the tracks are recorded with no processing. It's difficult to undo equalization, even if you write down exactly what you did, and it's just about impossible to remove compression! To me, one of the greatest features of DAW recording is the ability to defer all balance and tone decisions until mixdown. This feature is lost if you commit effects by writing them permanently to the tracks. The only exception is when an effect is integral to the sound, such as a phaser or echo on an electric guitar.
THE WINDOWS MIXER
Most pro-quality sound cards include a software "control panel" to set sample rates, operating levels, internal patchbay routing, and so forth. But consumer grade PC sound cards rely on the Windows mixer for level setting and input selection. You launch the Windows mixer by double-clicking the little yellow loudspeaker icon in the lower right of the screen. To get to the Record Panel screen shown in Figure 4, click the Options menu, then Properties, and under Adjust volume for, select Recording as shown in Figure 5. If you have a typical consumer sound card, you should select Line-In as the recording source and be sure to set the input level to maximum.
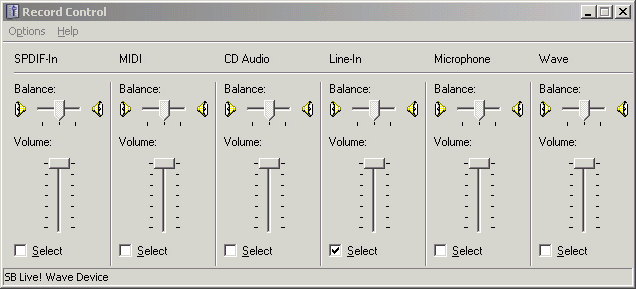
Figure 4: The Windows Mixer Record Panel
The Windows mixer Play Control panel (not shown) adjusts the mix of sources that play through the Line Output jack of the sound card. The Record Control panel lets you select one input from which to record. Be aware that the Windows mixer is probably hiding some input and output level controls. Yet those sources can contribute hiss from an unused input or add noise generated by the hard drive or video card. For example, you might hear scratching sounds as you move your mouse or as things change on the screen. Therefore, you should select all of the available playback sources in the Properties screen (Figure 5) to make them visible. Then mute or turn down all the sliders you are not using, such as TAD (telephone answering device), Microphone, and so forth. You can hide them again afterward if you don't want to see them.
Most Creative Labs SoundBlaster cards also have a WhatUHear input source that records the same mix of sources defined in the Play Control panel. If you have a SoundBlaster card, do not use WhatUHear when recording audio because that will add whatever tracks you are playing along with to the current recording. It may also add hiss to the recording because it includes the MIDI synthesizer, CD Audio, and other inputs if they are not muted. The only time WhatUHear is useful is when you need to record audio from the sound card's MIDI synthesizer or convert a MIDI track that uses SoundFonts to an audio track, and you want to include the sound card's reverb in the recording. Otherwise, select MIDI as the record source and add reverb later to the audio track in your DAW program.
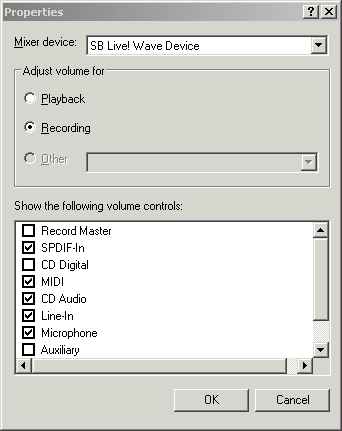
Figure 5: The Windows Mixer Properties
OTHER DAW ISSUES AND ADVICE
Ethan Winer has, at various times, earned a living as a studio musician, computer programmer, audio engineer, composer/arranger, technical writer, and college instructor. He now heads up RealTraps, a manufacturer of bass traps and acoustic treatment.
Entire contents of this web site Copyright © 1997- by Ethan Winer. All rights reserved.