| www.ethanwiner.com - since 1997 |
Keep Your Music PC Happy
Part 2 - Menu and Folder Organization
by Ethan Winer
This article first appeared in the November 2002 issue of Keyboard magazine
In Part 1 of this series, I explained the many advantages of partitioning your hard disk as well as ways to back up your system and data files. This installment digs deeper by showing how to organize your Start menu and program folders for maximum efficiency and convenience. Being organized lets you work smarter and helps keep your computer running more reliably. If you ever had to track down an intermittent connection in a rat's nest of cables crammed behind a rack, you'll appreciate the advantage of being tidy. Keeping your computer clean and uncluttered is exactly the same, and I'll describe the best ways to do that. In the next and final installment, I'll describe optimizing your Windows computer for recording audio and present many related tips and suggestions you are sure to find useful.
ORGANIZE YOUR START MENU
Windows offers three different ways to launch your programs: via icons displayed on the desktop, shortcuts in the Start bar and Programs menu, and icons on the taskbar at the bottom of the screen. I avoid placing shortcuts on my desktop because they are hidden when programs are running. Complex programs like an audio DAW display more information when they use the entire screen, yet that hides everything underneath. Therefore, I use a three-level approach for launching programs, which gives me fast access to any program without first having to minimize programs that are already running. I am in and out of different programs all day to check my email, search Google or look up hardware specs on a vendor's web site, edit graphics for a web page, and so forth. By keeping programs I use most often only a click or two away, I can get a lot more done.
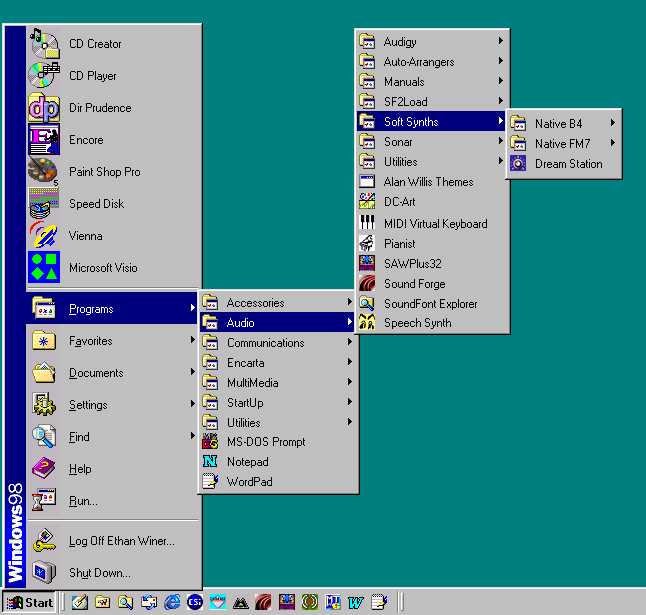
For programs I use all the time, I have a shortcut on the taskbar at the bottom of the screen, which requires only one click to launch them. Programs I use less often have shortcuts on the Start menu bar - the upper portion of the Start menu. Shortcuts for all other programs are organized by category in folders on the Programs menu list. That is, the Programs menu has folders for Audio, Utilities, Accessories, and other folders organized by purpose. This is shown in Figure 1. Contrast that with the way most Windows computers are set up, where the desktop is cluttered with icons, and a single long list of unrelated shortcuts are all lumped together in the Programs menu.
Figure 1: My Programs menus are organized by category, and in some cases they're nested several levels deep. With hundreds of different programs, this lets me quickly find the one I want. Note the shortcut to Control Panel on the taskbar (second icon from the left).
Most programs create an entry in your Programs menu when you install them. After a while you end up with a long list of programs that requires scrolling through several screenfuls whenever you want to run one that's near the bottom. So to stay organized you should move them to other menu folders that are organized by purpose, or to the Start menu or taskbar for even faster access. Copying Programs menu shortcuts and folders is similar to copying files and folders in Windows Explorer - simply drag items from the menus where they were installed to other menus or the taskbar to make them more accessible. If you use the right mouse button instead of the left button, when you're done dragging, Windows asks if you want to copy the shortcut there or move it. I generally use Move since I don't need the same shortcut in two places.
TIP: Regardless of how your program menus are organized, you can right-click in any menu - even those on the Start bar - and select Sort by Name. This also works for your Internet Favorites list.
Some programs install a menu folder containing unnecessary items like Help, New Project, and other things you can easily access from within the program. You can usually delete everything except the main shortcut that launches the program, to avoid navigating yet another folder layer. However, before deleting an Uninstall shortcut, you should verify that the program is listed in Add/Remove Programs in the Control Panel. If a program's installer does not create an entry in Add/Remove, I move the Uninstall shortcut to a dedicated Uninstall folder, then rename the shortcut to the program's name. If you prefer to leave a program's menu folder intact, you can rename the main program's shortcut with a leading underscore and select Sort by Name to force it to the top of the list. Simply right-click on the program's name and select Rename, then right-click again and select Sort by Name.
Note: Windows XP handles the taskbar and Start menus slightly differently from earlier versions. Right-click on the taskbar to access all of the options, such as displaying the Quick Launch toolbar so you can store shortcuts there, and Unlock so you can see all of the shortcut icons at once.
To create a shortcut to the Control Panel, simply drag it from the left pane in Windows Explorer to the taskbar. You can also create a taskbar shortcut to Windows Explorer, and even tell it which drive and folder to show initially. From the Start menu select Settings, and then Taskbar & Start Menu. Click the Start Menu tab, then Add, and then Browse. If you have Windows 98, ME, or XP, navigate to the \Windows folder and find Explorer.exe. In Windows 2000 Explorer.exe is usually in the \WINNT folder. Then click Next and scroll to Desktop at the top of the list. Once the shortcut is on your desktop, you can move it to the taskbar and optionally specify which folder should be opened initially. Right-click the new shortcut and select Properties. In the Target field add /n,/e,c:\ after the program name to start at the root of drive C: or any other location, as in this example that starts in the \Images folder on drive F: C:\WINDOWS\EXPLORER.EXE /n,/e,f:\Images
You can also create shortcuts to data files to call them up with a single mouse click. For example, I have a .doc file that contains a detailed list of all the instruments in my SoundFont collection, which I refer to constantly. A shortcut on the taskbar calls up the list with only one click. I also have a Programs menu folder containing links to .pdf product manuals and .doc files. When I need to look up something, I know right where to find it.
With newer versions of Windows, program shortcuts and system files are not always kept in the same place. The best way to find these and other files and folders is with the Find feature (called Search with newer versions of Windows). From the Start menu select Find (or Search), then select For Files or Folders. You can enter either a complete file name or just part of the name and search a single folder, drive, or even every drive on your computer. You can also invoke Find (or Search) from within Windows Explorer. If you right-click on a drive or folder name, searching is restricted to that drive or folder and optionally to all folders it contains.
TIP: If a shortcut or its command line file name doesn't work properly, enclose the path names (separately) in quotes like this: "C:\Program files\Sonar\Sonar.exe" "E:\Sonar data\Elli's song"
Just as creating categories for your Programs menu helps you navigate your programs, you should also organize your Internet Favorites shortcuts if you have to keep track of many. In addition to the Favorites menus, Internet Explorer offers a Links list of shortcuts that appears on the toolbar for quicker access. The first thing I do when setting up a new computer is delete the useless Links shortcuts that were installed by default, and add new ones for Google, my home page, and other sites I visit frequently. My Favorites menus have more than 300 shortcuts and - no surprise - they are all organized into categories, such as Audio Forums, Hardware Vendors, Humor, Search Engines, and so forth.
ORGANIZE YOUR FOLDERS
Besides organizing your Programs and Internet Favorites shortcuts, it is also helpful to keep your program and data folders in a logical order. You probably don't need to visit your \Program files folders every day, but you may need to look there occasionally for Readme or .ini files. Most programs let you specify the folder during installation, but once a program has been installed, it's best to leave it there. COA (Change Of Address), a free download from PC Magazine at www.pcmag.com/article/0,2997,a=3368,00.asp, lets you move a program after it is installed, but it's better to establish a folder hierarchy at the start. I have Audio and Utilities folders under \Program files, similar to the way my Programs menus are organized. In some cases these are several levels deep: \Program files\Audio\Programs, \Program files\Audio\Plug-ins, and so forth. With more than 800 programs folders, this is the only reasonable way to keep track of what I have.
Some simple and shareware programs do not include an installer and are meant to be placed in a folder manually and launched from there. Start Windows Explorer and navigate to \Program files in the left pane. Then right-click in a blank portion of the right pane and select New, then Folder. Enter an appropriate name for the folder, then copy the program and any ancillary files there. Finally, create a shortcut to the program as described earlier.
TIP: Basic file and folder management - rename, delete, create a new folder - can be performed from within most file Open and Save As dialog boxes by right-clicking as you would do in Windows Explorer.
In Part 1, I described how to partition a hard disk to keep your data files separate from the partition that holds Windows and your programs. I have a separate "small data" partition with folders for MIDI files, Doc files, CD cover designs, downloaded programs and driver updates, and so forth. Other partitions hold large data, such as Wave files. Besides helping to stay organized, using separate partitions simplifies backing up your data by copying selected folders in these partitions to CDRs or a second hard drive.
Many programs let you specify where various project and template files are stored; but the default is usually a folder under the one where the program is installed, for example, C:\Program files\Sonar\Cakewalk Projects. This is not a good place to store your data because saving and updating those files fragments your Windows drive, and for other reasons explained in Part 1. When a program allows it, I recommend changing the default location for project and other files to a separate data partition. Unfortunately, Microsoft does not let you specify where the Address Book is stored; I copy it periodically to my small data partition so it's backed up with my other data files. The easiest way to find your address book is to search drive C: for files named *.wab. Note that Windows XP by default excludes hidden and system files from searches, so examine all of the search options and make sure all are enabled.
You should also create a \Temp folder, or even an entire Temp partition as I have, and download and unzip programs there. Many downloadable programs and driver updates arrive in Zip files, which you must unpack before you can install them. If you unzip to a dedicated \Temp folder, you can delete everything in that folder afterward without worrying that you're deleting the wrong files. I use a separate Temp partition so the frequent saving and deleting doesn't fragment my other partitions. You should also save the original downloaded Zip or .exe files in case you need them again later. That great shareware program you rely on may not be available on the web if you need to reinstall it or when you get your next computer. For driver and program updates, I also keep previous versions in case the new one is buggy or doesn't work properly for some other reason. The same holds for online documentation. If the only manual available is on the vendor's web site, capture all the pages and save them locally. From Internet Explorer select File, then Save As.
Besides organizing the folders on your hard drive, I urge you to keep physical (paper) folders, or at least a shoebox for all of your hardware and software manuals and CDs. Too many times I've needed to reinstall a program or driver update for a client, who can't find the original manual or install CD. Or a friend will buy a new computer but can't remember where he put the paper with his name and password to log onto the Internet.
TIP: Avoid storing everything under \My Documents. Besides violating the advice to keep all data in a separate partition, having many files in that particular folder can make Windows run more slowly.
CONFIGURE YOUR DESKTOP
In Part 3, I will describe many performance and convenience optimizations, but a few are worth including here. One is to disable the Recycle Bin for those partitions that hold only large or temporary files. By disabling the Recycle Bin, you'll avoid getting the "File to large to store" message every time you delete a large file. I set the Recycle Bin to protect C: and my small data partitions, but not the drives that hold my Wave file final mixes, temporary web files, and other temporary files. While you're there, turn off Windows 98's annoying "Disk full" warning, which pops up at inconvenient times and warns even when there's still plenty of room. If you're really brave, disable Delete Confirmation too so you won't be pestered with "Are you sure?" warnings every time you delete a file. Note that when you delete a file on a drive for which the Recycle Bin has been disabled, you'll still be asked to confirm even if Delete Confirmation is turned off.
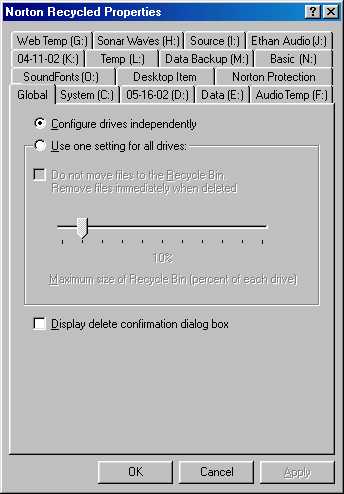
Figure 2: The Windows Recycle Bin lets you configure each hard drive and partition separately, to control how much space is set aside for deleted files, and whether you want to be warned every time you delete a file.
The "Disk full" warning applies to Windows 98 only. In Windows Explorer or My Computer, right-click on a drive letter and select Properties. Then click Disk Cleanup, the Settings tab, and uncheck the box labeled If this drive runs low on disk space, automatically run Disk Cleanup. To disable Delete Confirmation (all versions of Windows), right-click the Recycle Bin icon on the desktop. One of the choices is Properties, which presents a series of tabs, with one for each drive plus another labeled Global. This is shown in Figure 2. In the Global tab, tell Windows to configure drives independently. Then as you select each drive tab, you can specify how much of that drive or partition to allocate for a Recycle Bin, or disable the Recycle Bin entirely for just that drive.
Another useful tweak lets you see window contents while dragging and resizing them. You can get to the Display settings dialog from the Control Panel, but a faster way is to right-click in a blank area of the desktop and select Properties, then the Effects tab. For Windows XP, this and other graphics settings are under Control Panel, System, Advanced tab, Performance Settings. Check the box labeled Show window contents while dragging so you can better see what you're doing, instead of having only a barely-visible outline. Note that this feature taxes the CPU slightly, which can be a problem on slower computers if you drag a window while a complex mix is playing. I suggest turning off all other visual effects.
While you're in the Display properties dialog, experiment with higher screen resolutions. Most Windows computers are set for a screen size of 800 by 600 pixels, which doesn't show much information. Unless your monitor is very small, try 1024 by 768 or even 1280 by 1024. It may be worth having to get a little closer to the screen in exchange for being able to see more tracks at once. Also, set the color depth to 16 bits instead of 24 or 32. The additional colors are not needed for audio work, and this may reduce the load on your CPU.
Besides disabling unnecessary visual effects, you should turn off all sounds. Nothing is more irritating than a constant barrage of whooshing and bleeping sounds every time a program opens, closes, or pops up a dialog box. Worse, the standard Windows sounds play loudly, which can damage your speakers if you are mixing a quiet passage with the volume turned way up. From the Control Panel, click Sounds (or Sounds and Multimedia or Sounds and Audio Devices), then from the Schemes list select No sounds. Another new Windows "feature" I find annoying is Personalized Menus, which hides all Programs menu shortcuts except those you've used recently. You can disable that easily enough: Start menu, Settings, Taskbar & Start Menu, then uncheck Use Personalized Menus. This option is buried a little deeper in Windows XP: Right-click the Start menu, select Properties, the Start Menu tab, then Classic, Customize, and under the Start Menu Options list, uncheck Use Personalized Menus.
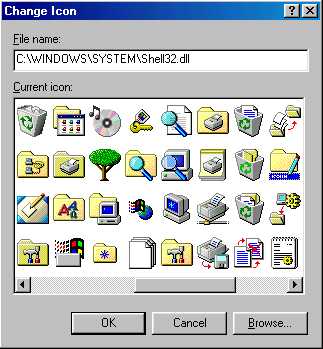
Figure 3: The Shell.dll file included with all versions of Windows is a rich source of alternate icons you can use for your program shortcuts.
You can also change the icons that Windows displays for your shortcuts, to make them more distinctive. Right-click on any shortcut icon and select Properties, then Change Icon. Many programs contain an assortment of icons embedded within their .exe files, but you can also click the Browse button to find other icons in other files. One great source for many different icons is the shell.dll file that comes with Windows and is shown in Figure 3. If you have Windows 98, this file is in the \Windows\System folder; Windows 2000 puts it in \WINNT\System32, or find it in \Windows\System32 with Windows XP. Again, you can use Find or Search from the Start menu to find this file, then go back to Browse to select an icon you like.
I've saved the best Desktop optimization of all for last - buy a second video monitor! Now that 19-inch monitors cost less than $200, there's no excuse to put up with switching constantly between your DAW's Track View, Piano Roll, Event List, and Mixer windows. You'll need either a second video card or, better, a new card that can drive two monitors directly. But a second video card is an inexpensive solution that works well on all but the slowest computers. I have Sonar configured to fill the entire screen on my left monitor with the Track View, while the right monitor displays the Piano Roll, Event List, and BigTime display. Once you have used a DAW with two monitors, you will never be able to go back to using only one.
CONFIGURE WINDOWS EXPLORER
Perhaps I'm a Luddite, but I prefer Windows to be as unobtrusive as possible. I don't need dancing dogs to help me find a file, and I prefer not to waste a third of Explorer's file name list with a huge and useless drive letter icon. If you agree, it is easy to configure Windows Explorer: From the Tools menu, select Folder Options, then Classic style. Next, go to the View menu, select Details, and uncheck as Web page if applicable. Selecting Details tells Explorer to show all properties of your files in columns. Then you can click a column heading to sort the list by name, last modified date, and so forth to find the file you want. Click again and the sort order is reversed. You can also type the first letter of a file or folder name to jump to that portion of the list.
I keep most folders sorted by name, but sorting by date lets me see the most recent files, and sorting by type groups the files by their extension. This is a great way to see all of the Wave or MIDI files in a folder, for example, when you want to copy them all. To find large files you no longer need and want to delete to free up some disk space, use Find or Search and under Advanced, tell it to find all files that are larger than, say, 5 MB. Then sort the resulting list by size so you can see which files take up the most room. If you saved a file recently but can't remember where, tell Find to display all files that were created or updated in the last few days, and then sort the list by date.
You can also adjust the column widths by clicking and grabbing the dividing bars at the top of each column. Once you have a folder set exactly as you like, go to the Tools menu, select Folder Options, the View tab, then click Like Current Folder or Apply to All Folders to make all your other folders appear the same.
One very important tweak tells Windows to show all file extensions. By default, file extensions - usually the last three letters of a file's name - are hidden from you in Windows programs. This is very dangerous because you can't tell if a file that arrives as an email attachment is a harmless JPG image or a malicious executable virus! You should also tell Windows Explorer to show all files including system and hidden files. If you ever have to update a .dll or other system file manually, you'll avoid wasting a lot of time looking for files that are really there but hidden from view by Windows.
From the Tools menu in Windows Explorer, select Folder Options, and then the View tab. Under Hidden files select Show, uncheck Hide file extensions for known file types, then check Remember each folder's view settings. That last item lets you view some folders sorted by name and others by date or type. And for folders that have hundreds of files, you can view the file names in a list without the details, to see more names in each screenful without scrolling. Whatever option was last used for viewing a given folder, it will be remembered the next time you look there.
BE CONSERVATIVE
No, I'm not talking about politics! But resist the temptation to download and install a zillion freeware goodies or every product demo you come across. I have a friend who bought a new computer, and then installed every free plug-in he could find. He had twelve different parametric equalizers, five software sample players, and many other duplicated programs. Every program you install takes up disk space and, with Windows, most also add an entry to the Registry, which wastes memory. Worse, when you uninstall most programs, they leave behind some or all of what they added to the Registry. So over time the registry grows ever larger, leaving less and less memory for Windows and your programs.
Also, as I explained in Part 1, always back up your Windows partition before installing a new program or driver, or at least keep in mind what you've added or changed since the last time you backed up in case you have to restore. I have an old Pentium 120 that I use to try out demos and shareware, and that has saved me from installing a lot of junk on my "real" computer. Every few months I run Norton Ghost to restore the 120's hard drive to a clean slate.
Finally, don't be like my friend "Leading Edge Doug" - if it ain't broke, don't fix it. Just because Microsoft or any other company releases a new version of a program you use, don't feel compelled to buy it just to stay current. (The same is true for hardware - the longer you wait, the more reliable it is and the less it costs.) It is no secret that many new programs are buggy, and a wise person never buys software with a version number ending with ".0" Before buying my first Pentium computer with Windows 95, I waited until the "A" patch was available. I did the same thing a few years later and waited until Windows 98SE was out before upgrading, and then again with Windows 2000 and its Service Pack 2 update. While others were cursing Microsoft for all the problems they had, I was getting the work done with a previous, but stable, version. Added August 1, 2002: And when you do upgrade to a new version of any program, always save the previous version in case you discover later that the new one has bugs.
Ethan Winer is an audio consultant who specializes in configuring Windows-based computers for recording. He also plays the electric guitar and bass, and is principal cellist for the Danbury (Connecticut) Community Orchestra. He now heads up RealTraps which manufactures bass traps and acoustic treatment for record studios.
Entire contents of this web site Copyright © 1997- by Ethan Winer. All rights reserved.