| www.ethanwiner.com - since 1997 |
|
The Art of
Equalization
by Ethan Winer
(This article first appeared in the August
1979 issue of Popular Electronics magazine.)
Ethan's new book
The Audio Expert explains
equalizers in much more detail than this article. |
A growing number of audio enthusiasts are using equalizers to adjust
their stereo system's frequency response, whether to compensate for room acoustics or for
creative recording purposes. An equalizer is a device that allows you to adjust the
frequency response of an audio signal, and even conventional bass and treble controls
qualify as equalizers. More often, however, the term implies equipment that is more
complex and sophisticated, such as that used by a mixing engineer. Let's take a look at
some of the reasons equalization (EQ) is useful and how its implementation has developed
into a high art.
 Standard bass and treble
tone controls are broadband devices that have the greatest effect at the frequency
extremes - that is, the highest highs and the lowest lows. While this is fine for touching
up the response in your car stereo, it offers little help in correcting narrow-band
colorations, which often are quite disturbing. For example, a peak in the response of an
audio system in the middle-treble region can produce a shrill or scratchy quality that a
normal treble control cannot effectively tame. Turning down the treble enough to eliminate
the shrillness kills too much of the highest treble, robbing music of clarity and sparkle.
Similarly, using a bass control to correct tubbiness or muddy bass response also falls
short of success. Turning the control down to relieve such mid-bass exaggeration would
simply remove the deepest frequencies so important to life-like reproduction, while
perhaps still allowing some muddiness to persist. There's got to be a better way - and
there is.
Standard bass and treble
tone controls are broadband devices that have the greatest effect at the frequency
extremes - that is, the highest highs and the lowest lows. While this is fine for touching
up the response in your car stereo, it offers little help in correcting narrow-band
colorations, which often are quite disturbing. For example, a peak in the response of an
audio system in the middle-treble region can produce a shrill or scratchy quality that a
normal treble control cannot effectively tame. Turning down the treble enough to eliminate
the shrillness kills too much of the highest treble, robbing music of clarity and sparkle.
Similarly, using a bass control to correct tubbiness or muddy bass response also falls
short of success. Turning the control down to relieve such mid-bass exaggeration would
simply remove the deepest frequencies so important to life-like reproduction, while
perhaps still allowing some muddiness to persist. There's got to be a better way - and
there is.
Enter the Graphic Equalizer. The graphic equalizer has become very
popular in recent years. It is called graphic because, as the front-panel sliders
are adjusted, their positions give an approximate display of the resultant frequency
response. These devices divide the audible spectrum into five or more frequency bands, and
allow adjustments to each band via its own boost/cut control. Instead of broad adjustments
of treble, bass, and maybe the midrange (sometimes called presence), we now have
independent control over the low bass, mid-bass, high bass, low midrange, and so forth. If
we attack that shrill mid-treble emphasis with an octave-band graphic equalizer, we should
be able, more or less, to correct for only the troublesome peak. We'll have to settle for
"more or less" because it is unlikely that any response anomaly will correspond
exactly to the frequencies available on even a ten-band device. Therefore, many
professional sound contractors, recording studios, and audio enthusiasts seeking precise
results use the even greater resolution afforded by 1/3-octave equalization. The
1/3-octave graphics usually have 27 bands and can, when teamed up with the proper
measuring equipment, be used to make just about any high-quality speaker system flat to
within a dB. or two over much of the audible range. But there's much more to EQ than
simply correcting less than ideal loudspeakers and listening rooms.
EQ IN THE STUDIO
Now, let's look at the professional recording studio with its
abundant knobs, lights, and buttons. This is where the multiple original tracks are
adjusted in level and equalized before being mixed together to comprise the final
two-track product. The key phrase is "before being mixed." Whereas the home
listener can alter the program only in its entirety, the recording engineer can - and must
- equalize sounds picked up by each microphone separately. The tool of choice for this
application is yet another equalizer referred to by many as the console type.
Virtually all professional mixing consoles use this sort of device, with one available for
each mike or line input. Additional equalizers are often devoted to echo and reverb lines
to tailor the tone of those devices.
A typical front panel for a console equalizer (Figure 1) shows that
we're back to the bass-mid-treble format. But there are no less than five different
frequency choices for treble, eight for midrange, and another five for bass. In addition,
a three-position low-cut filter is provided, as is an in/out switch for instant comparison
of Before and After. Here we have a device that can control fifteen different frequency
ranges and also be made small enough to fit in quantity into a single mixing board. (A
large console will have some thirty or more of these, so size is an important factor.)
Though all fifteen frequencies cannot be adjusted simultaneously as with the graphic, this
rarely is needed in a "one-for-each-mike" situation. Besides, you can always
patch a graphic EQ into the signal path when you absolutely have to.
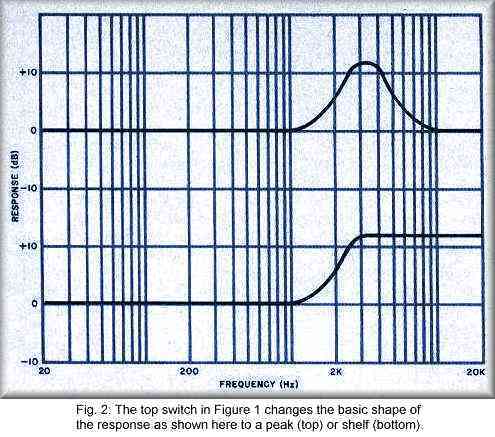
The last controls, the Peak/Shelf switches, change the basic shape
of the response curve. This is shown in Figure 2, where in both cases treble frequency has
been set to 3.2 KHz. and 12dB. of boost is applied. The upper curve represents the switch
in the Peak position while the lower curve shows a Shelf. Notice that, while the treble
peak affects mainly the specified frequency, there is still some influence on nearby
frequencies, whether boosting or cutting. In the Shelf position, the boost or cut reaches
its maximum [or more commonly, is 3 dB. shy of the maximum] at that frequency and remains
there for all higher frequencies. The same principle applies to the bass control. The
boost or cut reaches maximum at the named frequency but instead continues downward
thereafter. The midrange has no shelf capability, but the more expensive recording
consoles generally have a second, additional midrange control for added flexibility.
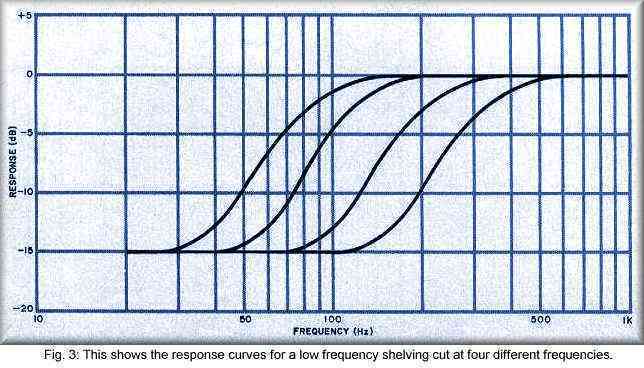
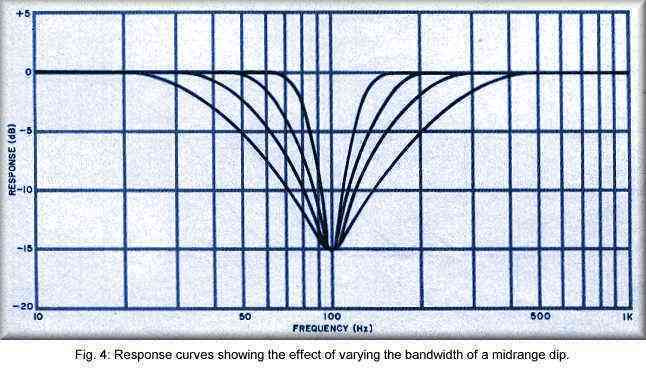
Figure 3 shows bass shelf cuts at four different frequencies. Figure 4 illustrates the
effect of varying the bandwidth of a midrange dip. Bandwidth? Well, now we're
talking about the parametric equalizer, the most recent addition to the EQ machine family.
PARAMETRIC POWER
In a sense, the parametric equalizer is the most powerful of the
equalizer types, allowing continuous adjustment of all equalization parameters (hence the
name). It is structured similarly to the console equalizer, but there are differences
worth elaborating. First, and probably most important, all controls of a parametric are
continuously adjustable. Potentiometers, rather than discrete, switch-related resistors,
are employed as the tuning elements, allowing a choice of virtually any center frequency.
Boost and cut controls are also continuous and frequently offer a range of +/-20 dB, more
than is characteristic of other equalizer types.
Another important difference is the inclusion of a bandwidth
control. It was explained previously that when boosting or cutting a frequency, the effect
spills over to adjacent frequencies. How far away from the indicated center this influence
extends is determined by the setting of the bandwidth control. When set to Narrow, only a
small range of frequencies are influenced. This is particularly useful for applications
such as removing extraneous ringing and false tones from a drum, but without changing the
basic sound character. On the other side of the coin, this narrow-band setting can be used
to emphasize a single tone and can often effectively "purify" a muddy-sounding
tom tom by boosting the fundamental pitch. Of course, this is not a substitute for proper
tuning of the drums, but when all else fails... Except when dealing with drums and perhaps
some tuned percussion instruments like triangles or cowbells, narrow-bandwidth boosts
should usually be avoided because unpleasant resonances or other bad effects may be
revealed when the mix is heard on different speakers. In fact, most recording studios have
alternate speaker systems available for making instant comparisons.
Broad-bandwidth settings accentuate a larger range of frequencies,
which is often more natural sounding than narrow bandwidths. Parametric equalizers are
inherently peaking rather than shelving devices, but a wide setting can reasonably
approximate a shelf. Do not confuse peaking with boosting, though. Peaking refers only to
the shape of the curve, not to whether it is being boosted or attenuated.
All this newfound versatility, however, is not without some potential drawbacks.
Probably the most obvious is the lack of precise repeatability. Since the operating
controls are continuously variable, it may be difficult to recreate settings exactly to
perhaps undo something you later don't like. Another factor is noise. Parametric equalizer
designs generally use more op amps per frequency band than do graphic and console types.
This means that cumulative noise can be more of a problem, especially when large amounts
of boost are used. Distortion can build up in a similar fashion, though the latest
high-slew rate, low-noise FET input op amps are bringing both of these factors under
better control. Still, most commercially available units have a switch to bypass each band
or section when it's not needed.
While studios have not unanimously traded in all their old
equalizers for parametrics, many have added at least one or two. And some of the newer
mixing boards are showing up with equalizers having a sweepable midrange band or a
two-position switch for sharp or broad peak shape selection. So a few of the conveniences
are added without having to go to a full parametric design. Now that we've looked at the
different types of devices and know how they operate, how can we use EQ to best advantage?
When and how would a professional recording engineer use it? Well, first we should note
that equalization can be used in two basic ways; as a tool and for personal taste.
EQ AS A TOOL
If you reflect on the task of a recording engineer, the idea that he
or she is going to run into problems should not seem surprising. The difficulties
encountered may lie in the areas of instrumental balances, equipment overload,
signal-to-noise ratio, and frequency response, to name a few possibilities. When the
problem can be traced to frequency response - and quite a few can - the equalizer becomes
an extremely valuable tool.
For example, one problem that occurs regularly is caused by proximity
effect, a bass boost that occurs when a directional microphone is placed close to the
sound source. Here, the low-cut filter would be your best bet. First, it will attenuate
the excessive low-frequency signal before it enters the rest of the EQ circuitry,
minimizing the chance of overload; second, it will leave the bass control free for other
uses if needed. (If the mike offers a switchable low-cut filter, use that to keep the
unwanted frequencies from getting into the preamp in the first place, for even more
overload protection.)
Another proper occasion to use the low-cut filter is when recording
vocals close-up. Not only to reduce the proximity effect just mentioned, but also to
minimize popping Ps, which contain a lot of low-frequency energy. Moreover, rumble and
low-frequency mud can enter your recordings from extraneous vibrations such as walking on
non-concrete floors, air conditioners, and the like.
Treble is often accentuated to increase clarity or to enhance the
presence of a vocal or string part that might otherwise be lost in the mix. Horns,
cymbals, acoustic guitars and many other instruments can also be greatly enhanced in this
way, but the engineer must know where the formants (the most important characteristic
frequencies for the various instruments) lie. Boosting high treble on an instrument with
little output in that region will do nothing but add hiss. In fact, when dealing with such
an instrument, it is often possible to make a substantial improvement in the
signal-to-noise ratio by carefully reducing the unnecessary high-frequency bandwidth with
a treble control on each channel for frequencies beyond the range of interest. This is
most effective when done during mixdown, as tape hiss will also be reduced. For this same
reason, when treble boost is employed it is usually best applied before the tape recorder.
EQ can also help to correct for poor room acoustics. Recording live,
even the most accurate mike may not capture that terrific sound you hear when you stand
right next to the instrument. Close-miking may help, but in many cases this is impractical
since many instruments do not radiate sound from a single point source. Consider a grand
piano, string bass, xylophone, or gong. All of these project sound from a large surface
area, leaving no ideal single mike position that is close to all parts of the source. Such
large instruments require a more distant microphone placement if a well-balanced pickup is
to be had. Unfortunately, as the distance between source and mike increases, the acoustics
of the room begin to affect the sound. This isn't always bad - a good room often adds a
warmth and character unobtainable in any other manner. But when a close-up sound with lots
of presence is desired, equalization in the form of treble boost or midrange cut can often
do the trick.
SEASONING TO TASTE
While no one yet has been able to define what sounds good and what
doesn't, recording engineers have developed various techniques for emphasizing what they
consider to be the more pleasant qualities of musical sounds. In fact, most engineers
pride themselves on getting their own sound. This is an area of taste, so naturally there
are no hard, fast rules to apply. Some good starting points can be established, though, as
follows. Generally speaking, you would boost treble for clarity or presence (the midrange
can affect this too), and bass for fullness or punch. Sometimes it seems that no matter
how much top or bottom you add, something is still not right. Often the real culprit is
one or more unpleasant resonances caused, as mentioned earlier, by either microphone
characteristics or placement, or even by bad qualities within the instrument itself,
especially if it is out of adjustment or of low quality. Eliminating these midrange
resonances will often improve the sound and minimize a need to boost highs and/or lows.
To find these magic EQ settings, start by turning off all but the
principal microphone that is picking up the instrument you're working with. If it's the
snare drum, for example, shut off the tom and kick mikes. They'll interact later anyway,
but the less you need to concern yourself with now, the better. Next, try boosting some
different midrange frequencies, adding at least 10 or 15 dB, to make the changes obvious.
Where you start naturally depends on the instrument. Since physical resonances of
instruments usually fall between, say, 100 Hz. and 1 or 2 KHz., these frequencies are
likely starting points. After determining which one sounds the worst, return to
the flat setting momentarily to allow your ears to readjust, and then cut the chosen
frequency in small steps until the optimum improvement is reached. The same general plan
can work for boosting, although then you'd be looking for frequencies that make the sound
better when boosted instead of worse.
When adding treble or bass, be sure the controls are doing what you
expect them to. If you don't obtain an appreciable improvement, move on to a different
frequency. Remember, a lot of boost at the extreme low end can route excessive infrasonic
energy to the loudspeakers, which could damage them. Similarly, too much ultrasonic
content can damage tweeters and overload the tape deck. Even with VU meter indicators in
the black, safety is not guaranteed: the limited frequency response of most meters
sometimes prevents them from giving a true picture. Also, VU meters tend to miss sharp
transients from drums and other percussion instruments; the pointer simply cannot move
fast enough. Pre-emphasis (a form of treble boost) within the tape deck can also aggravate
the situation, so be particularly careful at the slower tape speeds.
SIDEBAR: SPECIFIC INSTRUMENTS AND
THEIR CHARACTERISTIC FREQUENCIES
The chart below lists some common instruments with frequencies at which boost or cut can
be effectively applied to cure various problems or obtain certain effects. Indicated
frequencies are necessarily approximate, as no two instruments sound exactly alike. The
Comments column gives cautions or observations based on experience. They should be taken
as guidelines rather than prescriptions, because every situation is different and every
recordist has his own sonic goals. A few general hints may contribute to the effective use
of equalization.
(1) Your memory is shorter than you think; return to a flat setting now and then to
remind yourself where you began.
(2) Make side-by-side comparisons against commercial releases of similar types of music;
this will help you in judging overall blend.
(3) You can tailor the sound of an instrument only so far without losing its identity;
every instrument can't be full, deep, bright, sparkly, etc. all at once. Leave some room
for contrast.
(4) Take a break once in a while. Critical listening tends to numb one's senses after a
while, especially if you listen at high volume levels. Sounds may appear very different to
you the next morning.
(5) Don't be afraid to experiment. If you can't find just what you want with equalization,
try moving the mike a little; if that doesn't work, move the instrument. But, most of all,
keep trying.
Common Frequencies For
Equalization
Instrument |
Cutting |
Boosting |
Comments |
| Human voice |
Scratchy at 2 KHz. Nasal at 1
KHz. Popping Ps below 80 Hz. |
Hot at 8 KHz. Clarity above 3
KHz. Body at 200-400 Hz. |
Aim for a thinner sound when
blending many voices, especially if the backing track is full. |
| Piano |
Tinny at 1-2 KHz. Boomy at 300
Hz. |
Presence at 5 KHz. Bottom at 100
Hz. |
Don't add too much bottom when
mixing with a full rhythm section. |
| Electric Guitar |
Muddy below 80 Hz. |
Clarity at 3 KHz. Bottom at 125
Hz. |
|
| Acoustic Guitar |
Tinny at 2-3 KHz. Boomy at 200
Hz. |
Sparkle above 5 KHz. Full at 125
Hz. |
|
| Electric Bass |
Thin at 1 KHz.
Boomy at 125 Hz. |
Growl at 600 Hz. Bottom below 80
Hz. |
Sound varies greatly depending
on the type of bass and brand of strings used. |
| String Bass |
Hollow at 600 Hz. Boomy at 200
Hz. |
Slap at 2-5 KHz. Bottom below
125 Hz. |
|
| Snare Drum |
Annoying at 1 KHz. |
Crisp above 2 KHz. Full at
150-200 Hz. Deep at 80 Hz. |
Also try adjusting the tightness
of the snare wires. |
| Kick Drum |
Floppy at 600 Hz. Boomy below 80
Hz. |
Slap at 2-5 KHz. Bottom at
60-125 Hz. |
For most pop music, remove the
front head, then put a heavy blanket inside resting against the front head. |
| Toms |
Boomy at 300 Hz. |
Slap at 2-5 KHz. Bottom at 80-
200 Hz. |
Tuning and adjusting the head
tension makes a huge difference too! |
| Cymbals, bells, tambourines,
etc. |
Annoying at 1 KHz. |
Sparkle above 5 KHz. |
[Analog only:] Record
these instruments at conservative levels, especially at slower tape speeds. |
| Horns and Strings |
Scratchy at 3 KHz. Honky at 1
KHz. Muddy below 120 Hz. |
Hot at 8-12 KHz. Clarity above 2
KHz. Strings are lush at 400-600 Hz. |
|
Added October 7, 2001: A lot of people are concerned about
the negative effects of phase shift, and worry that equalizers may be ruining their audio.
I addressed this point in an audio forum on musicplayer.com, which is reprinted here.
Added April 9, 2006 - Here's an exchange from a web forum,
and my reply relates to this article:
> How do you get those mixes that just seem to sound better and
better the louder it gets? <
This is a great question, and more people should think about that
when mixing. That's a standard test for me when mixing - if I turn it up really loud does
it still sound okay? I've noticed the past few years especially that good mixes tend to
have this attribute. However, the first mix I ever heard like that was the debut album by
the band Yes all those years ago. They even wrote right on the LP jacket that you have to
turn it up really loud to get the full effect.
One factor is the bass level. I don't mean the bass instrument, but
the amount of content at very low frequencies. Say, 100 Hz and below. You simply have to
make the bass and kick a bit on the thin side to be able to turn the track's volume way up
without sounding tubby or distorting. Then when it's really loud the fullness kicks in.
You also have to decide if the bass or the kick will provide most of the oomph for the
track's bottom end. There's no hard and fast rule, but often in a good mix the kick is
clicky while the bass is full, or the bass is on the thin side and the kick is full with
more thump and less click.
Another factor is the harshness range around 2 to 4 KHz. A good mix
will be very controlled in this range, again letting you turn up the volume without
sounding too piercing. I listen to a lot of movie and concert DVDs, and the ones that
sound best to me are never harsh in that range.
Entire contents of this web site Copyright ©
1997- by Ethan Winer. All rights reserved.