| www.ethanwiner.com - since 1997 |
by Ethan Winer
This article first appeared in the September 1997 issue of Recording magazine.
Read all about
Ethan's |
It's a rare studio indeed that doesn't suffer from some amount of humming and buzzing noises. If you're lucky the problem occurs with just one or two pieces of equipment. But more often than not, there is a constant low-level hum that is clearly audible when you turn up your monitors. This article will address some common causes of hum, and describe ways to reduce it or even eliminate it entirely. I will also explain AC power line filters, and show how to replace noisy solid-state light dimmers with electrically quiet variable transformers.
HUM 101
Hum derives from the fundamental frequency of the AC power line, which in the USA is 60 Hz. However, most hum also contains harmonics of that fundamental frequency: 120 Hz., 180 Hz., and so forth. In fact, the only real difference between "hum" and "buzz" is that buzz has more harmonics, and those harmonics extend to a higher audible frequency.
There are three basic ways that hum and other power line-related noises can get into an audio system. One is through radiation in the air, such as when you bring an electric guitar close to the power transformer in an amplifier. In this case the guitar's pickup acts as an antenna that receives the 60 Hz. energy being radiated by the transformer. The whole point of using shielding to surround the center conductor on guitar wires and studio patch cords is to keep radiated hum from impinging on the wire inside the shielding.
The second way hum can be induced into an audio system is when a voltage difference exists between the common ground connections of two or more pieces of equipment. Third, clicking and buzzing noises can get into an audio device through the power wires. Every time an electric motor is turned on or off, the motor's coils "kick back" into the power line a brief but high-level voltage spike. The large motors used in refrigerator and air conditioner compressors are a common cause of audible clicks and pops. The power supplies used in most audio gear are unable to block these high-frequency impulses, and they pass right through the power supply into the audio circuit.
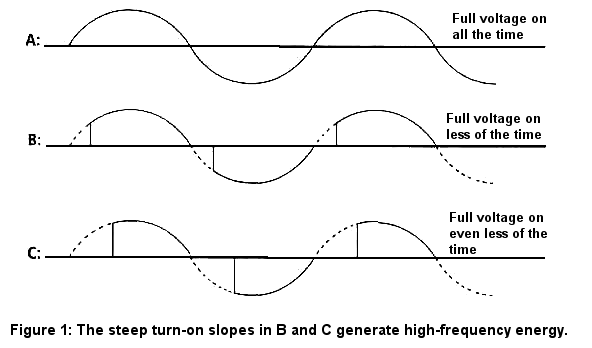
Similarly, solid-state light dimmers can create havoc with audio gear. These devices work by changing the amount of time the full power line voltage is applied to the light being controlled, as opposed to actually raising and lowering the voltage. Although AC power is supplied by the power company as a pure sine wave (having no harmonics), the dimmer's sudden switching of the voltage on and off actually generates harmonics which extend to very high frequencies. And these high frequency harmonics can get into audio gear both by radiation through the air and also by traveling through the power wiring directly into the audio circuitry.
COMMON GROUNDING
Most professional audio components use balanced signal wires to connect to the other equipment in a studio. With balanced wiring the audio signal is applied between two wires, neither of which is dependent on the common ground (shield) of the device. Theoretically, any voltage difference that's present between the ground connections of two audio devices will not affect the signal itself, because the signal path is unrelated to those ground connections. But many of the audio devices used in home and project studios do not use balanced wiring. In this case, the grounded shield is used as one of the audio wires. Thus, in an unbalanced system any voltage difference between the two ground connections becomes part of the audio signal itself.
One solution is to isolate the physical ground connections between every audio device. For rack-mounted equipment you can use plastic isolation tabs such as Humfrees. These clever gadgets physically isolate the metal case of each device from the rack's metal rails, preventing the devices from touching each other. Another possibility is to buy ground lift adapters that disconnect the grounding pin from the power cord of each piece of equipment. However, one device must be grounded properly. In my studio I have ground lifters on everything except my main mixer. The entire system is grounded through the audio wire shields that connect to the mixer, but only the mixer is connected to the power line's ground through the third grounding pin of its power cord.
Yet another solution - though this can become fairly expensive - is to buy audio isolation transformers and place them in the signal path between every piece of audio gear that uses unbalanced audio wiring. Note that all of these suggestions can be tried, and they are not mutually exclusive. In my studio, ground lifters were sufficient to eliminate all sources of hum. But had that not fully solved the problem I would have tried the Humfrees isolators next, in addition to the ground lifters.
INDUSTRIAL-STRENGTH LIGHT DIMMERS
Although ground lifters were sufficient to clean up the hum in my studio, they had no effect on the buzzing generated by the solid-state light dimmers used throughout the various rooms in my house. As I mentioned earlier, solid-state light dimmers work by varying the "duty cycle" (on/off time) of the full AC voltage that is applied to the lights being controlled. For example, if the voltage is applied for only half of each AC cycle, the light bulb will appear to be only half as bright as normal. And if the voltage is applied only one quarter of the time, the bulb will appear to be dimmer still.
Solid-state dimmers use the brightness knob setting to determine at what point in each voltage cycle to switch the light on and off. This sudden switching of the power is what generates the high frequency harmonics that permeate the air and power wiring with buzzing sounds. Fast changes in voltage correlate with high frequencies. So even though the fundamental power line frequency is a relatively low 60 Hz., suddenly switching on or off that low-frequency voltage will by definition create new, higher frequencies. This is shown in Figure 1 above.
 |
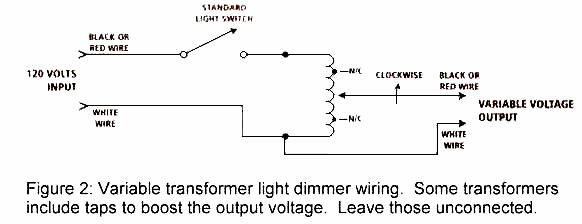
The solution is to replace all of the solid-state dimmers in your house or studio building with variable power transformers. These devices let you vary the 60 Hz. voltage directly, without generating any harmonic energy. The downside is that variable power transformers are somewhat more expensive than solid-state dimmers. But if you are willing to do the wiring yourself, the cost for each dimmer installed will be between $60 and $130, depending on how many Watts of lighting are to be controlled.
Mouser Electronics (800-346-6873; on the Internet www.mouser.com) sells the Staco line of variable transformers. These transformers are rated in Amperes, but you can easily convert that to Watts. Simply multiply the power line voltage (120 nominal in the USA) times the Ampere capacity to determine the equivalent number of Watts it can handle. Thus, a transformer capable of 3 Amps can control 360 Watts (120 Volts times 3 Amps = 360 Watts). For less heat generation and also longer transformer life I recommend at least a 20 percent capacity margin. So if you want to control a track light having, for example, five 75 Watt bulbs (375 Watts), you should buy a transformer that can handle at least 450 Watts.
If you live in an apartment house you may not be able to eliminate dimmer buzz from other apartments. But if the buzz goes away completely when you turn off your own dimmed lights (turned off completely, not just dimmed all the way down), then replacing those dimmers with variable transformers will solve the problem.
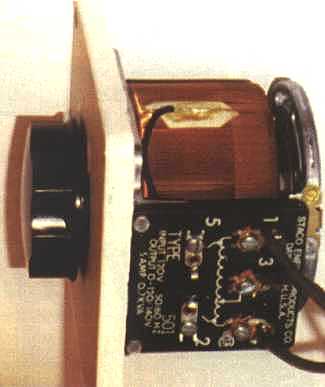
I installed seven dimmers in my house, using a variety of transformer sizes. Each transformer is mounted in a plastic electrical box that's placed inside the wall, and wired as shown in Figure 2. I also added a standard light switch to allow turning the light on and off without having to vary the dimmer level. This was done not only for convenience, but also to avoid unnecessary wear on the transformer's sliding brush contact.
As shown in the accompanying photos, a hole was made in the sheetrock wall large enough to accommodate the plastic housing. This hole should be adjacent to a wall stud, so you can screw the box to that stud for mechanical support. For the transformer shown in the photos, I cut off the entire back of the box with a hacksaw, to provide plenty of air circulation for cooling. Some of the other transformers I installed were small enough to fit into a standard 4-inch square plastic electrical box. For those I drilled a series of 1/2-inch holes in both the top and bottom of the box (as it is oriented when mounted in the wall), again to allow adequate air circulation.
I recommend that you first buy the transformers based on how many Watts of lighting you need to dim, and then measure them before going to an electrical supply house to buy the plastic mounting boxes. Also, be sure to use several extra feet of connecting wire, so you can place the transformers on a chair or cardboard box while you're working on them. I used 14 gauge lamp wire because it is more flexible than the Romex cable commonly used for electrical wiring, and thus less likely to stress the transformer's connection terminals. Of course, before you do any wiring you should remove the fuse or turn off the circuit breaker that controls the light being dimmed.
One final point: Never use any type of dimmer - either solid-state or a variable transformer - with fluorescent or neon lights. However, you can use a dimmer with halogen lights. In fact, the noisiest light dimmer in my house was one that came with a 500-Watt halogen floor lamp. For that one lamp I bought a variable transformer pre-mounted in a metal box with outlets and its own power cord (also available from Mouser).
 |
CLICKING AND CRACKLES AND POPS (OH MY!)
The most common cause of clicking and popping noises are from electric motors. As I mentioned earlier, whenever an electric motor is turned on or off, the motor's coils generate a brief high-voltage impulse into the power line. These impulse noises are known variously as RFI (Radio Frequency Interference), because they have energy that extends into the RF frequency range. As with the buzzing caused by the high-speed switching of solid-state light dimmers, the impulses from a motor's coils also create high frequency energy. But in this case the voltage is a one-time occurrence only. Thus, you get a clicking sound rather than a steady buzzing.
The best solution to these clicks is to install an RFI filter in the power line that feeds your audio equipment. In truth, it would be even better to put the RFI filter in line with the motor's power feed right where it connects to the AC wiring. This blocks the high-voltage transients at their source, and keeps them from getting into the AC power wiring at all. However, that would require buying a filter capable of handling the motor's full current draw. As with variable transformers, a large RFI filter costs much more than a smaller unit capable of handling only what your audio gear draws from the power line. Further, you can use several lower-cost filters - perhaps one for each power strip that feeds your audio equipment - rather than buy one large unit for your entire studio. In a pro studio I used to own we had a water cooler that made an audible click every time its compressor motor turned on or off. Since that motor was relatively small, I installed an RFI filter inside the cooler, wired directly to the pump motor. But for the room-sized air conditioner and oil burner motors common in most homes, it is more practical to install filters in the AC power lines that feed your audio equipment.
Although many low-cost power outlet strips sold at hardware and computer stores claim to include RFI filtering, in truth none of them contain filters that are really effective. You need to purchase a genuine industrial-grade RFI filter from an electronics parts supplier. Both Mouser (mentioned above) and DigiKey (800-344-4539; on the Internet www.digikey.com) sell the kind of filter I'm talking about here. I have used filters made by Corcom (sold by DigiKey) and Cornell-Dubilier with great success, and they range in price from $25 to $65 each, depending on their capacity in Amperes. Don't waste your time with cheaper units; buy only Series R two-stage L-C (inductor-capacitor) filters.
Added July 9, 2010: A number of people have asked me for links to suitable Corcom Series R filters. Here's what I found at Mouser Electronics:
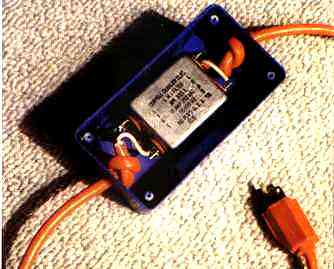
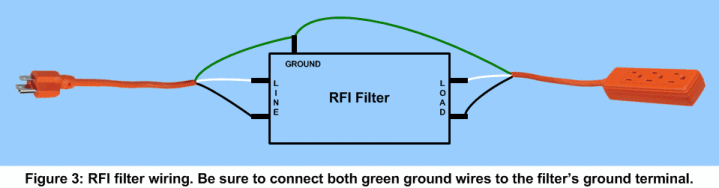
I mounted a 10-Amp filter in a Radio Shack plastic construction box, and connected it to a heavy duty AC extension cord that was cut near one end to accommodate the connections. This is shown in the accompanying photo. If you already have AC power outlet strips in your studio, you can simply cut into the existing cord and solder the cord's wires to the filter's terminals. Be sure to connect both ends of the AC power cord's ground wire to the filter's ground terminal. This is shown in Figure 3.
THE FUTURE OF AUDIBLE HUM
According to my crystal ball, most hum problems will someday be just a memory. With fiber-optic connections between all-digital audio equipment becoming more popular, there will eventually be no need for metal wiring at all except perhaps for microphone inputs. When my friend Doug installed fiber-optic cabling between his Yamaha O2R console and the ADATs in his professional recording studio, all of his previous hum problems disappeared.
However, there will always be a problem with air-borne electrical noises getting into guitar pickups. When I record myself playing the guitar in my MIDI/ADAT studio, I record both a SMPTE sync tone and also a mono mix onto two separate ADAT tracks. I can then turn off my computer and its monitor while I record, avoiding any interference from those sources. (During mixdown later the SMPTE signal drives my sequencer, but by then the guitar tracks are already recorded.) No matter where I stand, and even with the huge amount of gain needed to get a full fuzzing tone, the only noise I have to worry about is string buzz due to sloppy playing.
Added January 1, 2003:
I received an email from Chris Redmond who pointed out that hum can often be greatly reduced by connecting all of the device cases together with heavy wire. Since ground loops occur when a voltage difference is present between the ground terminals of connected audio equipment, using heavy wire - which has a low resistance - reduces that voltage difference.
Ethan Winer is a self-employed programmer, musician, and audio engineer. When he's not watching re-runs of The Simpsons on TV, Ethan enjoys writing and playing many different kinds of music.
Entire contents of this web site Copyright © 1997- by Ethan Winer. All rights reserved.