|
| www.ethanwiner.com - since 1997 |
The Audio Expert - Errata and Additions
The following updates are for readers of the
book's first edition.
There are currently no corrections or additions for the second edition.
Page 12, Chapter 1, Audio Basics: The top row of standard octave frequencies in Table 1.3 are not shown in a bold font. This table is correct:
| 16 | 20 | 25 | 31.5 | 40 | 50 | 63 | 80 | 100 | 125 | 160 | 200 | 250 | 315 | 400 | 500 |
| 630 | 800 | 1K | 1.25K | 1.6K | 2K | 2.5K | 3.15K | 4K | 5K | 6.3K | 8K | 10K | 12.5K | 16K | 20K |
Table 1.3: The standard octave (bold) and third-octave audio bands are named by their center frequencies.
Page 20, Chapter 1, Audio Basics: The text describes how digital equalizers work, but the explanation is too simplistic. The article Coding an Equalizer explains digital EQ in much more detail, and shows C code to implement a basic high-pass filter.
Page 49, Chapter 2, Audio Fidelity, Measurements and Myths: If you look closely you'll see that Figure 2.4 is not derived from the exact same data as Figures 2.2 and 2.3, though it makes the point well enough.
Page 75, Chapter 3, Hearing, Perception, and Artifact Audibility: The text mentions four audio files that play 100 Hz and 3 KHz tones at varying levels under pink noise, but those files didn't make it onto the book's web site. So here they are (each about 1.6 MB):
tones_plus_noise.wav
tones-10.wav
tones-20.wav
tones-30.wav
Page 86, Chapter 3, Hearing, Perception, and Artifact Audibility: This is the first place the term timbre is mentioned, though the term is used elsewhere in the book. Timbre is the tone quality of a musical instrument or voice, based on the relative level of the fundamental pitch and its harmonics. It's pronounced Tam-bur.
Page 107, Chapter 4, Gozintas and Gozoutas: The text states that the -10 signal level used by consumer audio devices is 14 dB lower than the +4 level used by professional gear. This is misleading because -10 refers to dBV and +4 is dBu. A level of -10 dBV is equal to -7.8 dBu, so the difference between the -10 and +4 standards is actually 11.8 dB, not 14 dB.
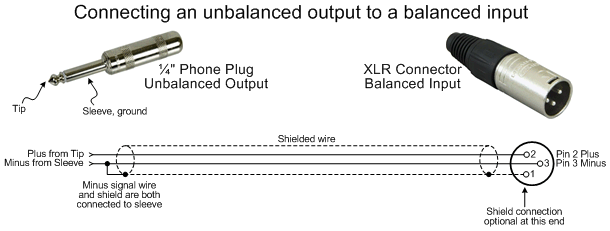
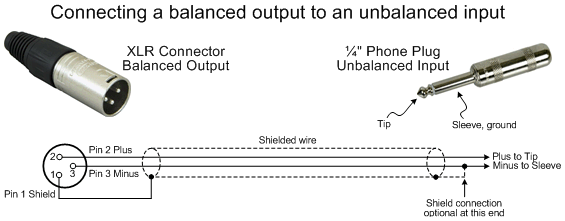
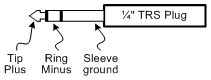
Page 108, Chapter 4, Gozintas and Gozoutas: Sometimes it's necessary to connect an unbalanced output to a balanced input, or vice versa, for example when connecting balanced gear to a mixer's insert points as explained on Page 112. The drawings below show how to wire custom cables that also avoid ground loops. Note that it's best to initially connect the shield at both ends. But if this results in hum or buzz from a ground loop, you can disconnect the shield at the receiving ends as shown. Also note that some balanced connections use a 1/4-inch TRS (Tip-Ring-Sleeve) phone plug instead of an XLR connector. The same wiring applies, though you'll connect the Plus signal to the Tip instead of Pin 2, and the Minus signal to the Ring instead of Pin 3. Finally, the pins of an XLR connector may be reversed depending on whether you look at the pins in front or the rear where it's soldered. So when soldering, check the pin numbers carefully where they are stamped onto the connector!
|
Page 110, Chapter 4, Gozintas and Gozoutas: To expand slightly on the text, many balanced outputs provide the same signal on the plus and minus connections, with the polarity of one reversed. If Pin 2 on an XLR output is +1 volt and Pin 3 is -1 volt, the total output is 2 volts for an increase of 6 dB compared to either pin alone. This "free" voltage increase can also improve the signal to noise ratio because noise is random and doubles by 3 dB, where coherent signals double by 6 dB, as explained on Page 61. However, not all balanced outputs provide an active signal on both wires. Sometimes to reduce costs one output is unpowered and remains at 0 volts. However, the signal is still balanced, and will reject hum caused by ground loops at the receiving end, as long as both wires have the same impedance to ground.
Page 224, Chapter 7, Mixing Devices and Methods: The text refers to a signal chain of EQ, compressor, then another EQ shown in Figure 7.4, but the correct figure is 7.3.
Page 242, Chapter 8, Digital Audio Basics: The text describes a simplified method of Sample Rate Conversion (SRC) when the original and target rates are even multiples, such as converting from 48 KHz to 96 KHz. In practice, each sample is not repeated, but rather new samples having a value of 0 are inserted between the existing samples. This reduces the overall signal level by 6 dB, but yields a flatter response than simply repeating samples. The volume loss is then countered by adding 6 dB digitally after the conversion. Again, this algorithm is used for the simple case of doubling the sample rate, though a similar process can be used for other integer ratios. Also, the text mentions simply playing audio from one device, then recording to a second device at the new sample rate. In fact, modern sample rate conversion algorithms use math to perform an equivalent process entirely in software.
Page 246, Chapter 8, Digital Audio Basics: Circuit design expert Tim Warneck pointed out an error in Figure 8.3 showing a simplified block diagram of an A/D converter. The corrected figure is below. Tim also reported the op-amp and active filter errors on pages 594 and 597 below. In a previous career Tim designed converters and op-amps at the transistor level, but he now repairs and retores vintage keyboards at his company RetroLinear.
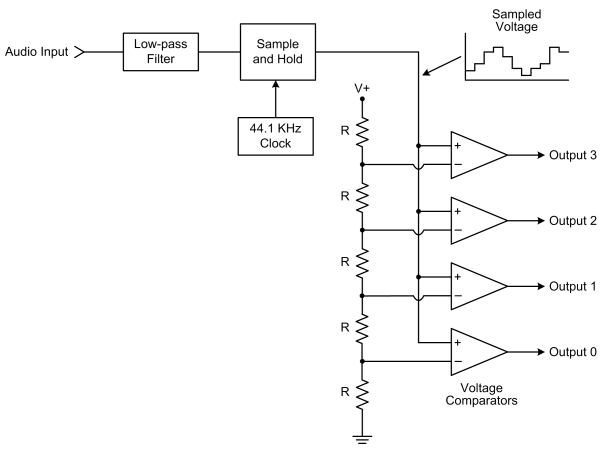 |
Figure 8.3: The key components in an A/D converter are an anti-aliasing low-pass filter, a Sample and Hold circuit that takes the actual snapshots at a rate dictated by the clock, and a series of voltage comparators that each output a zero or a one, depending on their input voltage.
Page 267, Chapter 9, Dynamics Processors: The text refers to a project I recorded using a gate to trigger the electric bass off the kick drum to perfectly synchronize the two tracks. I since found that recording and present it HERE for your amusement! Dave Hart wrote the tune and played the guitars, with Rob Usher on drums and me playing the bass. I also did the recording and mixdown, though more recently Peter Hodgson transferred the master tape to MP3 and tweaked the mixed audio.
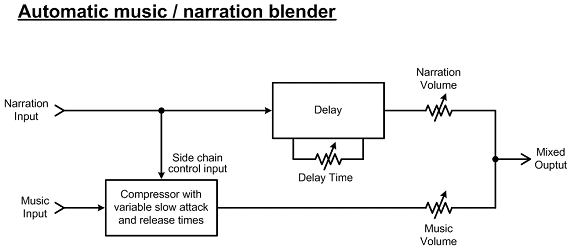
Also on Page 267 is a description of an automated "ducker" that blends music and narration, automatically reducing the volume in anticipation of the announcer speaking. The block diagram below shows how that's patched together. The compressor's Attack time controls how quickly the music drops in volume, and the Delay time determines how soon before the narration starts the volume drops. The compressor's Release time controls how quickly the music come back up, which should be similar to the Delay time.
 |
Page 304, Chapter 11, Time Domain Processors: Critical Distance is defined as the distance from a source where the direct sound and its reverberation are equal volume. The article Can small rooms have reverb? on the RealTraps web site explains the concept of Critical Distance in much more detail.
Page 343, Chapter 14, Synthesizers: The improved Figure 14.6 below displays several filter Q values at once, to better show how that affects the sound as the Resonance knob is varied:
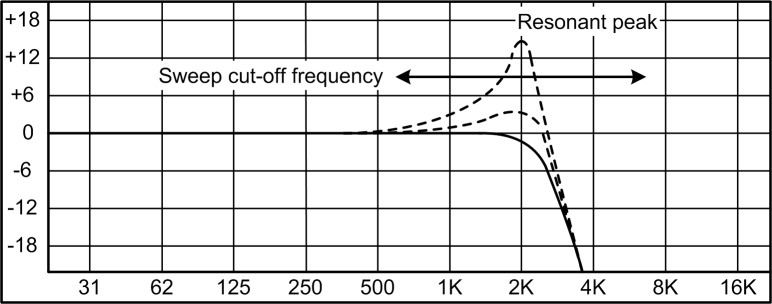
Figure 14.6: The classic analog synthesizer filter is a low-pass at 24 dB per octave, with an adjustable resonant peak at the cutoff frequency.
|
Page 386, Chapter 15, Microphones and Pickups: The text explains that a condenser microphone converts a changing capacitance to a voltage, but doesn't explain how this happens. A basic cardioid condenser mic has two elements that form the plates of a capacitor: One is the rigid back plate, and the other is the conductive diaphragm that flexes in response to changes in air pressure. A polarizing DC voltage is applied across the two plates, and that voltage varies as the diaphragm is displaced. The reason the voltage changes is the Law of Conservation of Energy. A given voltage across a given amount of capacitance creates a stored charge whose amount is expressed in Coulombs. The voltage (E) across a capacitor is equal to the charge in Coulombs (Q) divided by the amount of capacitance (C):
E = Q / C
So as the capacitance changes, the voltage must change to retain the same amount of energy stored in the capacitor. The Law of Conservation of Energy applies equally to loudspeakers. This is why a loudspeaker cone moves farther at lower frequencies, as described on Page 402 of the book. For a given amount of power applied to a speaker driver, if the cone moves more slowly then it must move farther to compensate and output the same volume level.
Page 405, Chapter 16, Loudspeakers and Earphones: The description of Acoustic Impedance for horn loudspeakers is backwards. This sentence shows the corrected wording in bold:
"The driver radiates directly into the narrow neck of the horn,
which presents a low high acoustic impedance to the
driver."
The corellation of acoustical wave pressure to electrical voltage, and wave velocity to electrical current, is correct as written. Thanks to black belt loudspeaker expert Dr. Earl R. Geddes for the correction.
Page 406, Chapter 16, Loudspeakers and Earphones: The text mentions that piezoelectric tweeters can be run without a crossover capacitor, but doesn't explain why. The reason is simple - the impedance of piezo elements rises at low frequencies, so less current is drawn. However, it's still a good idea to add a series capacitor because that reduces IM distortion in the tweeter by removing low frequencies the tweeter won't be handing.
Page 426, Chapter 16, Loudspeakers and Earphones: There are no real errors in the Loudspeaker Isolation section, but I have since tested isolation and found that it's even less useful than I had thought. My Loudspeaker Isolation article provides details of my experiments.
Page 435, Chapter 16, Loudspeakers and Earphones: The text explains that some loudspeaker manufacturers impose an intentional response dip in the "harshness" range between 2 and 4 KHz to make their speakers sound smoother and less fatiguing. This type of response is called the Gundry Dip, though as you'll read in THIS thread at the Hydrogen Audio forum, BBC engineer Dick Gundry would not have approved his name being associated with an intentionally skewed response!
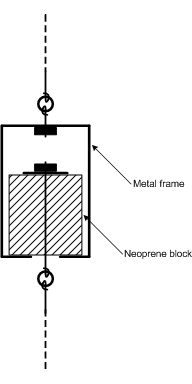
Page 494, Chapter 18, Room Shapes, Modes, and Isolation: The text describes using neoprene shock mounts and pads to decouple a wall or ceiling. It should have also mentioned that such pads, when optimally loaded, compress by about 15 to 20 percent. If the neoprene compresses less, then it's too dense for the weight and behaves more like a solid block of wood. But if it compresses too much it will bottom out, and again behave as a solid block. The animation below shows the neoprene ceiling hanger from Figure 18.16 being compressed by 20 percent under the weight of the ceiling. In this figure the suspended ceiling hangs from the lower wire, and the upper wire is attached to the rigid deck above.
 |
Page 515, Chapter 19, Acoustic Treatment: The text states that the Bag End E-trap active bass trap must be able to output as much volume as the main speakers to counter peaks and nulls and ringing. Jim Wischmeyer at Bag End emailed me: "The E-trap's output is very low in terms of SPL and does not have to keep up with the room speakers. The little 100 watt amplifier and the 10" speaker is not capable of very high SPL at the low frequencies. In our subwoofers we use more and bigger drivers and 500 to 1,300 watt amplifiers to reach high SPLs. What is actually happening in the E-trap is damping, so all it has to do is knock a few dB off the top of the resonance mode you're addressing. It's also working only at one or two frequencies, so it's not a very taxing job for the amp and speaker. Damping down a few dB (even 10dB as is sometimes realized) and the associated ringing as the mode decays does not actually take much power or speaker excursion. It doesn't have to match the room speaker's level so it doesn't take a big amplifier or push the speaker driver very hard. That's part of the elegance of the invention."
Page 578, Chapter 21, Electronics: The reference to Figure 4.5 from Chapter 4 should instead be to Figure 4.8.
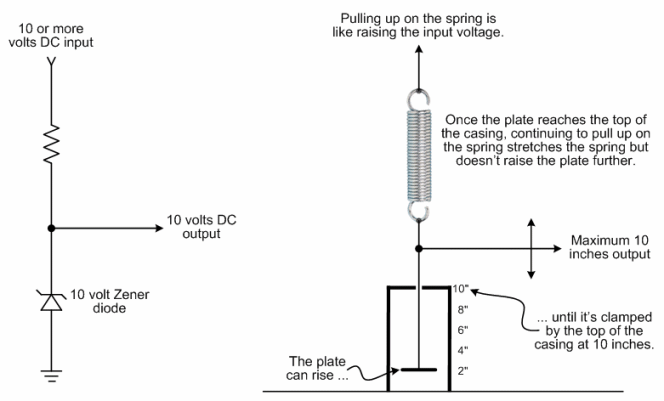
Page 583, Chapter 21, Electronics: In the section about diodes I didn't have room to include another useful type: A Zener diode is used in the reverse direction because its inherent voltage drop is much larger that way. As mentioned in the text, when current flows through a silicon diode in the usual forward direction, its output is 0.6 volts lower than its input. In the reverse direction current doesn't flow at all until the voltage reaches a much larger value called the breakdown voltage. This is the maximum voltage the diode can withstand, so the diode would normally be used in circuits where the operating voltage is lower. But this reverse voltage drop can be exploited in power supplies as a simple voltage regulator.
In the circuit below at left, as long as the input voltage is at least 10 volts, the output will always remain at 10 volts no matter how much the input voltage varies. In other words, the Zener diode "clamps" the output at a constant 10 volts. The series resistor is needed to absorb the difference between the input voltage and the constant 10 volts output. Without this resistor, the Zener diode would draw too much current and surely burn out. A mechanical equivalent is shown using a spring as the resistor. And just like the resistor, the spring prevents the mechanical pieces from damage when the input rises above 10 inches.
 |
Page 584, Chapter 21, Electronics: The reference to Figure 22.6 should instead be to Figure 21.12.
Page 594, Chapter 21, Electronics: The formulas showing op-amp gain versus resistance in Figure 21.18 had some minor errors. The figure below is correct.
 |
Figure 21.18: Most op-amps are integrated circuits, providing very high gain in an inexpensive self-contained package. Negative feedback sets the desired amount of gain, which also reduces distortion and improves the frequency response.
Page 595, Chapter 21, Electronics: This expanded description of slew rate and slew rate limiting also explains more about how capacitors charge over time.
Page 597, Chapter 21, Electronics: The circuit for the low-pass filter has R1 and C in series when they should be in parallel. The corrected figure below also adds formulas showing the pass-band gain and cut-off frequency.
 |
Figure 21.29: Active filters have several advantages over passive filters, most notably that the frequencies are not affected by the load impedance.
Page 629, Chapter 23, Musical Instruments: Table 23.1 lists a series of overtones as they occur in nature, and shows how far out of tune they are. To be clear, equal temperament intentionally places musical notes out of tune compared to the natural overtone series, rather than the other way around. So it's the tempered musical notes that are out of tune, not the natural harmonic series. Related, Page 631 doesn't distinguish between equal-tempered and well-tempered when it mentions J.S. Bach's The Well-Tempered Clavier series of compositions. These pages explain the difference in detail:
Well vs. Equal Temperament
Tunings Summary
Musical Tuning
Further, the entry for the 10th harmonic is incorrect as shown. The nearest tempered note is C# at 554.4 Hz as shown in the corrected table below.
| Harmonic | Frequency | Nearest Note | Nearest Note Frequency | Error |
| A Fundamental | 55 Hz | A | 55.0 Hz | 0.0% |
| 2nd Harmonic | 110 Hz | A | 110.0 Hz | 0.0% |
| 3rd Harmonic | 165 Hz | E | 164.8 Hz | 0.12% |
| 4th Harmonic | 220 Hz | A | 220.0 Hz | 0.0% |
| 5th Harmonic | 275 Hz | C# | 277.2 Hz | 0.8% |
| 6th Harmonic | 330 Hz | E | 329.6 Hz | 0.1% |
| 7th Harmonic | 385 Hz | G | 392.0 Hz | 1.8% |
| 8th Harmonic | 440 Hz | A | 440.0 Hz | 0.0% |
| 9th Harmonic | 495 Hz | B | 493.9 Hz | 0.2% |
| 10th Harmonic | 550 Hz | C# | 554.4 Hz | 0.8% |
| 11th Harmonic | 605 Hz | D | 587.3 Hz | 3.0% |
| 12th Harmonic | 660 Hz | E | 659.3 Hz | 0.1% |
| 13th Harmonic | 715 Hz | F | 698.5 Hz | 2.3% |
| 14th Harmonic | 770 Hz | G | 784.0 Hz | 1.8% |
Table 23.1: Harmonic Series of Low A Note.
Entire contents of this web site Copyright © 1997- by Ethan Winer. All rights reserved.