| www.ethanwiner.com - since 1997 |
Vienna SoundFont Studio
by Ethan Winer
(This is an edited version of my article in the May 1999 issue of Recording magazine.)
When you mention the name SoundBlaster to most audio professionals, the first thing that comes to mind is a low-cost sound card more suitable for computer games than serious audio recording. The original SoundBlaster card helped establish this reputation with its marginal audio fidelity and cheesy FM synthesizer sounds. But Creative Labs, Inc. changed all that in early 1997 when they quietly released the SoundBlaster AWE 64 series of audio cards. With the now-current SoundBlaster Live they upped the ante even further. This sound card is fully professional in both its features and audio specs, and it comes bundled with an impressive collection of software for use with Windows-based computers. In this article I will explain the Vienna SoundFont Studio sample management program that comes bundled with some versions of the SB Live. If your Live card did not come with Vienna you can download it for free from the Liveware Downloads area of the Creative Labs web site.
VIENNA SOUNDFONT STUDIO
The Vienna SoundFont Studio is a comprehensive sample management program that lets you import Wave files, loop them, add reverb and other effects, and define split points based on both note range and key velocity. Once you have defined all the parameters for a SoundFont bank, you can save the bank to disk and upload it to the AWE 64's User memory. Theoretically, you can have up to 128 sound banks - including the General MIDI sounds stored in ROM as bank zero - all accessible simultaneously from your sequencer's Voice menu. However, the amount of User RAM will likely limit you to fewer banks, depending on the size of the Wave files used within each bank. You can add any of the SoundBlaster's pre-looped ROM samples to the SoundFont banks you create, and these ROM samples will not impinge on the available User memory. Also, any Wave files you import can be exported later, so there's no need to keep the original files on your hard drive if you are short on disk space.

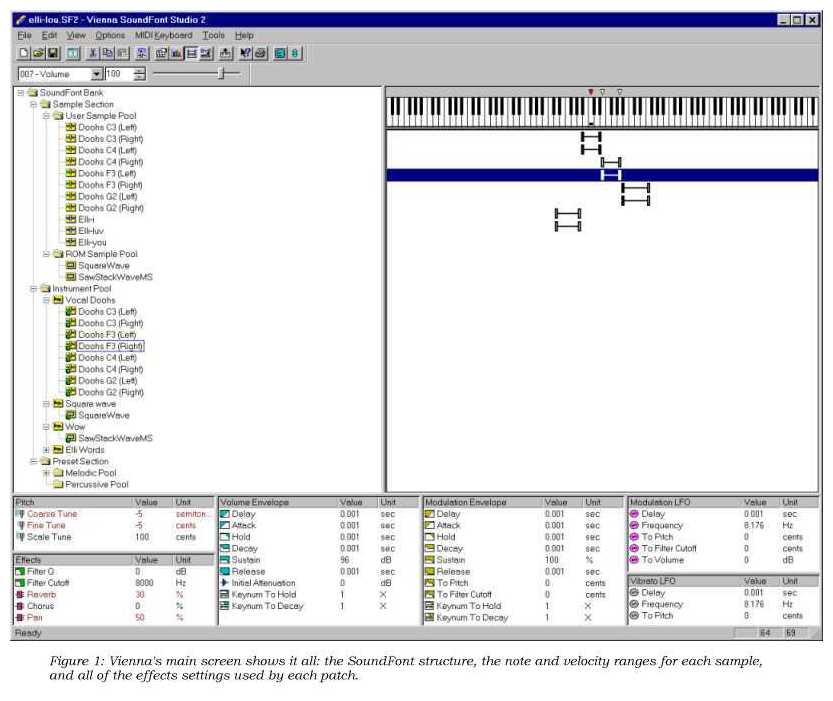
Creating a custom SoundFont bank is reasonably straightforward if slightly tedious. The biggest hurdle is understanding how the banks are organized. Figure 1 shows the Vienna main screen, which is divided into several sections. The upper-left area displays a tree view of the sound font bank, showing both the User (imported Wave files) and ROM samples being used in the current bank. The key ranges for each sample are set in the upper-right portion, although the key range display can be toggled to instead show the velocity switch points. The lower section of the screen is where you define the various synthesizer voice parameters, such as reverb, LFO rate and intensity, ADSR values, filter Q, and so forth.
KEY AND VELOCITY SWITCHING
All modern synthesizers and samplers employ multiple samples for each voice. For maximum realism, it is ideal to record a separate sample for every note playable by the instrument being sampled. However, a huge amount of memory would be needed to store all those samples. It is therefore common to record samples at selected intervals - perhaps at every three to five half-steps - and then pitch-shift those samples up or down during playback to reproduce the in-between notes. Instead of having to record all 88 possible notes for a piano patch, the sample recording of middle C could serve the range from B-flat below middle C through the D-natural above, and so forth. If you try to cover too broad a range with a single sample, the notes at each extreme will sound unnaturally affected. This is especially true for instruments that have a lot of inherent body resonance like violins and acoustic guitars. The pitch of the note is raised and lowered, but the natural resonances of the instrument's body are also shifted. Thus, a high violin note, for example, could sound as if it's being played on a violin only five inches long! Another problem caused by not sampling at close enough intervals is the sudden change in timbre that results when you play a scale as it crosses a sample boundary point.
Vienna lets you use as many or as few samples as you want for each voice, and you can control the range of notes for which each sample or group of samples will be used. You can also use more than one sample or group of samples for one note range, and you can switch between samples depending on the MIDI key velocity. Most instruments change their timbre when they are played loudly, so you could use one sample of a snare drum that was played lightly for note-on velocities of, say, 1 through 70, and then switch to another sample of the same drum struck harder for higher velocities. The note pitch ranges in the main screen of Figure 1 show which notes each sample serves.
You can also set an exclusive class for note groups, so that one note automatically terminates another in the same group. The classic example of this is when programming hi-hat samples. When a closed hi-hat sample is triggered, it should immediately turn off the open hi-hat sample if it is currently sounding. To program one or more samples to turn each other off, simply assign them the same class number. There are 127 exclusive class groups available, though it's doubtful you'd ever need more than two or three.
 SAMPLE LOOP POINTS
Looping is a technique that lets a synthesizer sustain a note for longer than the original sample recording. Most percussion instruments are not looped; when you strike a drum or cymbal, the sound goes through a predictable cycle of attack followed immediately by a decay until it has faded out completely. But most pitched instruments require you to define the start and end loop points if they are to be played in a sampler.
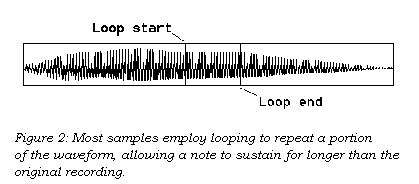
Loop points let you establish how much of the sample's waveform is played initially, and what later portion of the same wave will be repeated continuously for the remainder of the note's duration. Thus, you hear the start of the sample when the note first sounds, and then the area within the loop boundaries is played repeatedly for as long as the note is held. This is shown in Figure 2. Without looping, every sample file you record would have to extend for at least as long as the longest note you intend to play later. Looping lets you record only the first few seconds of each note, and any notes that need to sustain longer will do so by continuously repeating a portion of the Wave file. You simply tell Vienna where to set the loop boundaries - typically encompassing one or more cycles near the middle or end of the wave - and the AWE 64's hardware handles the rest. The loop point settings window is shown in Figure 3a.
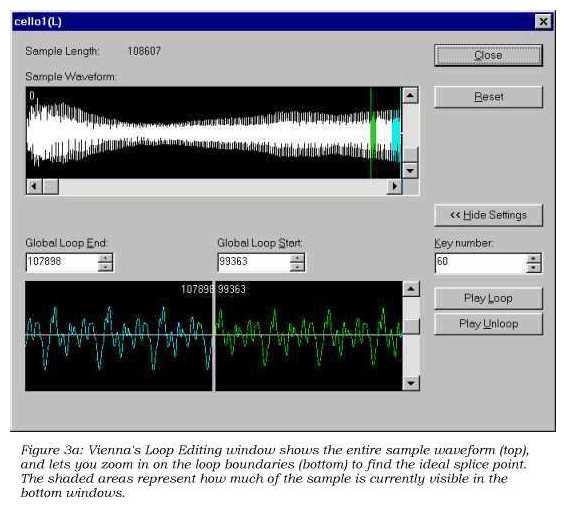
Setting loop points is easy for simple waveforms such as an acoustic guitar or saxophone: You establish where the loop begins and ends, being careful that the splice makes a smooth transition back to the earlier part of the waveform. However, for complex waveforms, such as a string or horn section, or a vocal group singing "Aah," the waveform will not repeat predictably within a single cycle. And if the loop ending point does not segue smoothly back to the starting boundary, you'll hear a repeated thumping or buzzing sound each time the loop repeats. Vienna makes it easy to set up looping by displaying the entire waveform, as well as the loop's start and end points. You can also zoom in and out on the wave to better see exactly where the boundaries lie. At the bottom of the Loop window is another zoomable display that shows the end of the loop region butted up to the region's beginning, along with the sample numbers of each boundary.
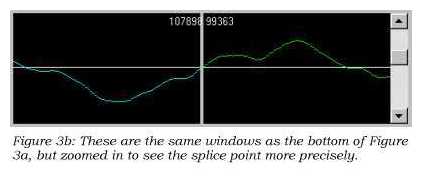 As you can see in Figure 3a, sample number 107898 is ascending in value
through zero, and sample number 99363 (earlier in the Wave file) resumes at zero and
continues positive. This is, therefore, an ideal place to set the loop for this particular
Wave file. If you click the Up and Down buttons next to the loop End and Start values, the
displays scroll horizontally helping you find the ideal boundary points. Figure 3b shows
the same loop values but zoomed in to better see the splice details. You can click the
Play Loop button at any time to hear the wave played back with the current loop values,
using the Key Number field to control which MIDI note number triggers the sample.
SOUNDFONT BANK ARCHITECTURE
SoundFont banks are organized in a tree-like structure, as shown in Figure 1. The basic building block is the Sample Section, which contains the samples you import as Wave files and identifies any ROM samples you plan to use. Instruments are built from these samples, and the patches you call up in a sequencer are built from the instruments.
For Wave files you import, you can double-click on the name in the Sample Section to call up the Loop Points window discussed previously. Note that this sets what Vienna calls Global loop points, and the loops you define here will affect every instrument that uses the sample. If you want to have access to a sample both with and without looping, you can leave it unlooped here and, instead, establish Local loop points later in the Instrument Pool. For samples that will be looped, it generally makes sense to set the loop values in the Sample Section; you can do that once per sample instead of repeatedly each time a sample is used in a different instrument. However, when called up from the Instrument Pool, the looping dialog adds an extra checkbox to specify how notes release when a MIDI note-off is received. The note ends by fading out while playing the looped portion; when checked, it resumes playing the Wave file after the looped region reproducing the natural sound of the note decaying. Of course, this assumes the sample recording includes the natural decay of the note.
The next level is the Instrument Pool, and it comprises the ROM and RAM samples you specified in the Sample Section. It is here that you name your instruments and specify which samples they use and what range of notes and key velocities each sample will serve. You can also define a large number of effects parameters for the instrument, such as coarse and fine tuning, LFO (vibrato) values, and envelope and filter settings. As with the Global and Local loop settings, you can set the effects parameters globally here or locally later on in the Melodic Pool section. Any effects you add here will have to be entered for each and every sample. If you add them later in the Melodic Pool, the effects apply to all the samples for an instrument in one operation. However, it makes sense to set some parameters globally in the Instrument Pool. For example, if some samples are slightly out of tune, you can correct them by the proper amount individually, as opposed to settling for a single correction for all samples. Likewise, for stereo samples you'll want to set the global panning hard left and right respectively because the local pan settings applied in the Melodic Pool will shift the entire stereo image. Many sound building blocks, such as ADSR and filter values, need to be set here at the instrument level.
The last branch on the sampler tree is the Preset Section, which holds both melodic and percussive instruments. Percussive instruments are those that respond to MIDI Channel 10, while melodic instruments respond to all other MIDI channels. The patches in both pools are based on instruments defined in the Instrument Pool, and it is here that you can apply global pitch correction, reverb, and chorus effects to all of the samples in an instrument at one time.
CREATING A SOUNDFONT
Now that you understand how SoundFont banks are organized, let's go through the process of recording a series of sample files and creating a new bank from scratch. For this exercise I'll describe the steps as I go along, using the Creative WaveStudio program that is bundled with the AWE 64 card. You can, of course, use any recording program you may have. My main axe these days is the cello, so I'll create a stereo sound bank that handles the first few octaves of this instrument. You can use a guitar or flute or whatever as you follow along. I prefer to record solo strings using two microphones, with each a few feet away from the instrument but aiming at different places. For the left mic I'll put an audio-technica AT4033 on the player's left and point it below the f-hole; for the other I'll place an AKG C451 on the right side pointing toward the cello's bridge. The mics go to a Mackie 1202 mixer, with the mic preamp direct outs fed into the AWE 64 card's left and right line inputs. This places as little circuitry as possible in the signal path and keeps the left and right mic channels completely separate.
Record the sample files
For brevity I'll record only five notes, though it would be best to record every other note or even every note. I could also record the open strings separately and store them in their own bank, because they sound different than fingered notes. But the point here is to show how to create a SoundFont, not to record the ultimate solo cello samples. For simplicity I'll play without vibrato because it can be added using an LFO later. Although it is sometimes better to sample with vibrato, that requires finding the best single loop point for both the note frequency and the vibrato rate. The notes recorded and the pitch range they will cover are shown in Table 1. I'll also create two patches that imitate a vintage analog synthesizer because that type of voice uses very different parameters than those for a sampled cello.
Wave File Name |
Note Recorded |
Note Range Covered |
| CELLO1.WAV | D on C String | C through E |
| CELLO2.WAV | G on C String | F through A |
| CELLO3.WAV | C# on G String | A# through D# |
| CELLO4.WAV | F# on D String | E through G# |
| CELLO5.WAV | B on A String | A and higher |
Table 1
Rather than record five separate files, it's easier to record a single file containing all the notes and split it up afterwards. WaveStudio's Options menu lets you set the sample rate and frequency, and control the mixer recording levels. Clicking the red Record button brings up the Recording dialog, where you enter a file name and test the record levels. To avoid noise I set the mixer's Line Input to maximum, all other inputs to minimum, and muted all inputs so nothing comes out of the PC's speakers. I then used the mic preamp trim controls to set the actual recording level.
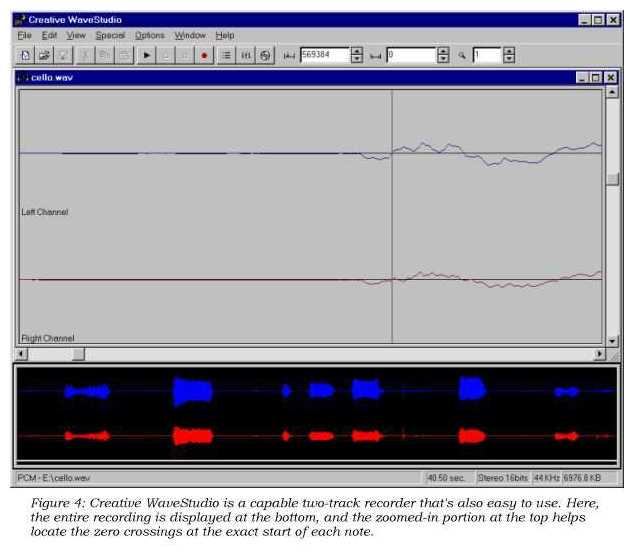
Figure 4 is the Creative WaveStudio screen; both windows are displaying the initial recording, including two false starts (the third and fourth blips) plus some chair squeaks. The lower window in WaveStudio always shows the entire file, and the upper window is zoomed in here to show the first cycle of the first note. To extract the samples, I'll mark and delete the regions immediately before and after each note, and then use the File..Save As dialog to save the note and reload the original file, repeating these steps five times. To mark a section, click and hold the left mouse button at one end of the region, and then drag the mouse to the other end. The scissors icon on the toolbar cuts the marked section, and you can repeat this as needed by zooming in on the exact start of the note. If you cut out too much, you can use Edit..Undo to restore the cut section and try again. To avoid a click, the cut before each note is made at a point where the wave for both channels crosses the center line. Since the recorded notes ended up at slightly different levels, I'll also use the Special..Amplify Volume feature to raise them closer to maximum for consistent playback later.
Import and Loop the Samples
We're now ready to start Vienna and import the five Wave files. Right-click on the User Sample Pool folder icon in the SoundFont tree, select Import User Sample(s), and locate each file in turn. Since we're also going to create some analog synth patches, right-click ROM Sample Pool..Add ROM Sample(s) and select SquareWave (near the end of the list). Now is a good time to use the File..Save As menu to establish a name for the bank and save what you have so far. But first call up the File..Information screen and enter Cello for the Bank Name, so you can identify the bank when you upload it to User memory later. Next, double-click on the left channel of the first sample to call up the loop editor screen. If you click on Play Loop now, you'll hear the entire sample played repeatedly; therefore, the next step is to set the loop end point. Adjust the slider at the right of the bottom window to zoom in until you can see several complete cycles of the waveform, as opposed to the smaller ripples that represent the note's harmonics. Then click on and hold the down-arrow button that controls the loop end point, until the wave at the middle boundary line is going upward and passing through zero.
To set the loop start point, either drag the green line in the upper display to the left or enter a value between, say, 500 and 10000 less than the end value in the bottom window's Global Loop Start field. Now zoom in a little more to see the exact splice point more closely, and adjust the values until they make a smooth transition. You can just as well set the splice point to where the waveform is going negative, and it doesn’t have to be at a zero crossing. Just be sure that the start point resumes in the same direction and at the same level as the end point leaves off. Although you can loop around a single cycle, many instruments will sound more lifelike if you encompass a few hundred cycles within the loop. Experiment until you are satisfied with the sound, and then loop the right channel using the values you just set as a starting point.
Define the Instruments
The next step is to create the Cello and Analog Synth instruments. Right-click on the Instrument folder and select New Instrument. Enter Cello as the name, then click cello1(L) and shift-click cello5(R) to select all five stereo sample pairs at once. Now repeat this entering Analog Synth Sweep for the instrument name and SquareWave for the sample name. To make the analog synth patch more interesting, we'll use two square waves - with one detuned slightly to fatten up the tone and make it richer sounding. Right-click on Analog Synth Sweep, select New Zone, and again select SquareWave for the sample. Since all of these samples will use looping, there's an extra step needed. Double-click on the Instrument Pool icon, then again on each instrument name, and yet again for every sample, clicking the Enable Looping field each time.
You can now define the note ranges that each sample will use. Click
on the first sample - the low D recording in cello1(L) - then grab and drag the left
boundary to the C two octaves below middle C and the right marker to the E above. Do the
same for the right channel. Repeat this for the remaining four sample pairs, with cello2
covering F through A, and so forth as shown in Table 1. Since the square waves will serve
all notes in the analog synth voices, they can remain spanning the entire range. If you
click on the Cello name in the Instrument Pool, you can test the notes using the on-screen
piano keyboard. Note that a left-click sounds the note for only as long as the mouse
button is pressed, and right-clicking sounds until you click the same note again. Also
observe that the velocity increases when you click closer to the bottom of the key.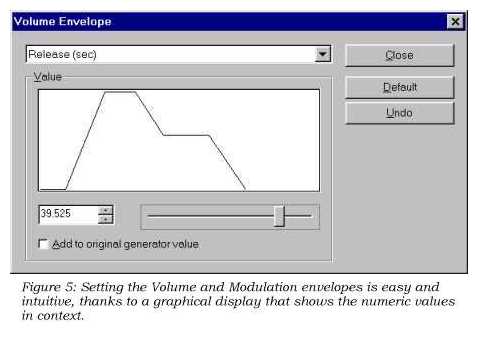
Since Vienna has no way to know what pitch you played originally when recording each sample, these notes will not be in tune. So the next step is to set the Root Key and fine tuning offsets. Right-click on the cello1(L) name and select the Properties dialog. Now you can coarse-tune the pitch by clicking a note in the cello1 zone with the on-screen keyboard. Compare the pitch you hear to a known standard and adjust the Root Key field until it is close to proper pitch. You can then change the Fine Tune value in the Pitch window at the bottom of the screen to adjust the pitch in one-cent intervals. (The instrument's Properties dialog is also where you assign the optional Exclusive Class group number mentioned earlier.) Repeat these steps for all of the remaining samples, using the same values for the left and right portions. The SquareWave ROM sample in my AWE 64 was in tune when I used 79 for the Root Key and -45 for the Fine Tune. Use those values for one of the SquareWave samples, but use -35 for the other's Fine Tune value. Finally, make a clone of the Analog Synth Sweep patch and call it Analog Synth Shimmer because all of the parameters entered so far apply to this patch as well. Highlight the Analog Synth Sweep name and click the Copy icon on the toolbar. Now highlight Instrument Pool and click the Paste icon. When Vienna asks for the name of the new instrument, enter Analog Synth Shimmer.
Create and Upload the Patches
The final step is to create the actual patches that are called up from your sequencer. We'll also add reverb to the Cello patch; and filter, LFO, and ADSR effects to the analog synthesizer patches. In the SoundFont tree, right-click on Melodic Pool in the Preset section and select New Melodic Preset. Both the bank and preset (patch) numbers come up as zero, which you should accept; all you have to enter is the preset name Cello and select the same-named Instrument as the preset's source. Although you can store more than one bank in a SoundFont file - needed only to allow more than 127 patches - the first one should always be 0. These numbers are relative, and the absolute bank numbers are assigned sequentially when the bank is loaded into the AWE 64's User memory later on. Now add another melodic preset, this time naming it Analog Synthesizer Sweep. As you can see, Vienna automatically assigns the next available preset number, which in this case is 1. Repeat this once more for the Analog Synth Shimmer patch.
The cello patch requires only reverb, so let's do that first. In the Melodic Presets section double-click on Cello, and then highlight the Cello instrument to enable the effects settings at the bottom of the screen. Click on the Reverb value (zero initially) to call up the Reverb dialog, and set the value to 50 percent or whatever sounds good to you. Then do the same for the two analog synth patches. For an enhanced stereo effect, you can optionally crank up the Chorus effect on both analog synth patches.
The analog synthesizers will use filter, ADSR, and LFO effects as well as reverb, so let's take care of those now. Unfortunately, you can't set these once for every instrument used by a preset in the Melodic Pool; rather, the values must be assigned repeatedly for each zone in the Instrument Pool. Double-click on Analog Synth Sweep, and then highlight the first SquareWave zone name. In the Effects window, set Filter Q to 18 and Filter Cutoff to 500 Hz.; in the Modulation Envelope window, set Attack to 3.5 seconds and To Filter Cutoff to 3000 cents; and in the Vibrato LFO window, set Delay to 0.5 seconds, Frequency to 4.5 Hz., and To Pitch to 20 cents. Then repeat the same settings for the second SquareWave zone. Of course, these are meant just as a starting point, and you could even use different values for each zone. For the Analog Synth Shimmer voice, we'll apply the LFO to the filter's cutoff frequency, instead of sweeping it linearly. Again set the Filter Q to 18, but this time adjust the Filter Cutoff frequency to 5000 Hz. Now set the Modulation LFO Frequency to 6 Hz. and the To Filter Cutoff value to 1000 cents. Finally, click on the Disk icon to save the completed SoundFont bank to disk.
Banks are uploaded to User RAM in the AWE Control applet's User tab. Set the Current State field to the first available value (001 if no other banks have been uploaded), and then click the Browse button to navigate your hard disk for the CELLO.SF2 file. When you select that file and click Apply, the Cello bank name will appear in place of 001. You can now click the Playback tab and verify that the bank is loaded, by specifying the Cello bank and clicking notes on the keyboard picture. Since there is now only one User bank in memory, it will be bank 1 because the default GM sounds are in bank zero. If you want to replace the default GM bank with your own samples, click the Synth tab, select User Synth in the Available Synth listbox, and use Browse to find the file. In case you change your mind later, reinstate General MIDI as the Available Synth and set the file name to C:\WINDOWS\SYSTEM\SYNTHGM.SBK.
ACCESSING A SOUNDFONT FROM YOUR SEQUENCER
Although using bank switching to exceed the MIDI limit of 127 sounds is not a new concept, there is no standardized way to specify banks that works for all synthesizers. Indeed, the Master Tracks Pro sequencer I use supports four different methods. (To access the default GM sounds in bank zero you don’t have to specify a bank.) The AWE 64 hardware uses the two-byte method, where a 32 is sent as the low byte, and the bank number (1-127) is passed in the high byte. To access the banks you uploaded to User memory from Master Tracks, enter the bank number and select 0/32 for the method. The MIDI Orchestrator Plus sequencer bundled with the AWE 64 Gold card requires you to specify each byte separately, so put a 32 into the BkLsb (Bank Least Significant Byte) field and the bank number (1-127) in the BkMsb (Bank Most Significant Byte) field. Understand that the CELLO.SF2 file described herein comprises a single bank with three patches, so you can get at all of the sounds by specifying bank 1 and patch numbers 1 through 3.
Ethan Winer, a retired computer programmer, lives in New Milford, CT. He plays the cello in several local orchestras, and never worries about samplers taking work away from "real" musicians.
Entire contents of this web site Copyright © 1997- by Ethan Winer. All rights reserved.