 |
Basic Brightness / Contrast adjustments can greatly improve photos that are too dark to see clearly. There will be two controls: first adjust the brightness, then adjust the contrast, then the brightness again if needed. |
| www.ethanwiner.com - since 1997 |
Photo Editing Basics
These days everyone has a high quality camera. Even if you don't have a fancy digital model, modern smartphones can take truly excellent photos. With basic photo editing software almost anyone can produce high quality images. This article explains some basic procedures, and is meant for people who want to improve the photos they post on social media. It is not for photographers looking for advanced or even intermediate level techniques. This is about making photos clear and legible, not artful or well composed.
Shooting
Hold your camera still as best you can to avoid a blurred image. If possible, lean against a nearby wall or chair. Even better, get a tripod. A cheap tripod is vastly better than no tripod, and it ensures the camera won't move and blur the image in low light. Cell phone tripods cost less than $20, and useable camera tripods start at $25. If all else fails, many photo editing programs have a Sharpen feature that reduces blurriness.
Also, try turning off the flash to see if it makes your photo look better. Without the flash the exposure takes longer, making a tripod even more necessary to avoid blurring. So shoot both ways - with and without the flash - then you can decide later which version looks better and has more accurate colors.
If you have a choice, it's always better to have light behind you than behind what you're shooting. One of the most common problems I see is a group of people sitting around a table, with bright light in a window behind them. So people in the photo are dark, and the background dominates by being so much brighter. Thankfully, this can often be improved with photo editing software using the gamma adjustment described below.
Most smartphone photos I see are narrow vertical strips, but wide shots are often more appropriate. Unless you're shooting a photo of a tree or your child practicing pole vaulting, or aiming for a particular effect, consider turning the camera sideways. This is how humans normally see, and you can always use the Crop tool to trim the sides later if needed, or to better center the main attraction in the shot. This applies even more to videos. I see parents post videos of their children on stage in a school play or dance recital, where they keep panning back and forth to keep their kid within the narrow frame. If you turn the camera sideways you can capture the entire width of the stage, or zoom in on your child while still providing plenty of buffer space on each side to keep her within the frame.
Photo Editing Software
Microsoft offers their Windows Photo Editor program as a free download, and Mac owners can use the free Preview program already in their computer. If you Google "free photo editing software for X" you'll find many others, where "X" is Windows, Mac OS, or smartphones. Look for programs that have at minimum the adjustments described in this article. Good programs will also show your changes in real time as you adjust the controls. Once you have the software read the manual, or at least browse through all the program menus to see what features are available.
Brightness and Contrast
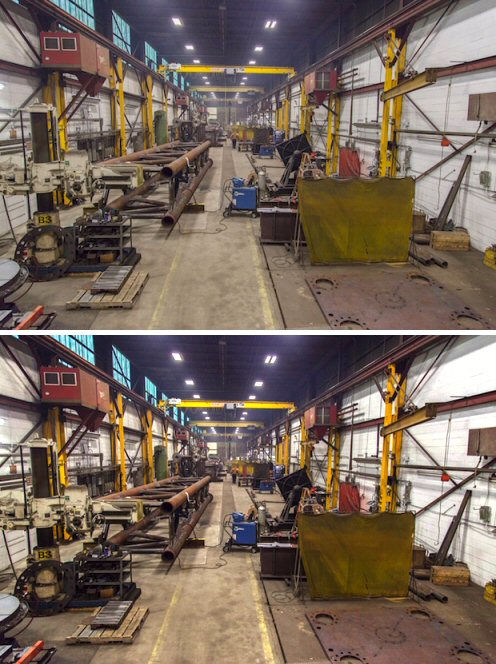
This is probably the most basic tool you'll use. Even if your camera is set to Automatic when shooting, it's still common for photos to be too dark to see faces and details clearly. Or they may be bright enough, but look washed out with too little contrast. The photo below was improved using only the Brightness and Contrast controls.
|
Basic Brightness / Contrast adjustments can greatly improve photos that are too dark to see clearly. There will be two controls: first adjust the brightness, then adjust the contrast, then the brightness again if needed. |
Gamma
One problem I often see in family photos on Facebook is everything is so dark you can barely make out the faces. This can happen simply because there's too little light, but it's more likely when something else in the frame is bright and the camera reduces the overall brightness to compensate. One of the most powerful photo editing features I use is the gamma adjustment. Gamma increases the brightness of an image, but only for the dark portions. Bright areas are left alone. This next photo shows one of my pinball machines before and after increasing the gamma. You can see that the lights on the playfield are more or less the same brightness in both shots, but all of the dim portions are much brighter in the lower clip. After raising the gamma you may need to increase the contrast and possibly lower the brightness a little, though I did not do that in this example.
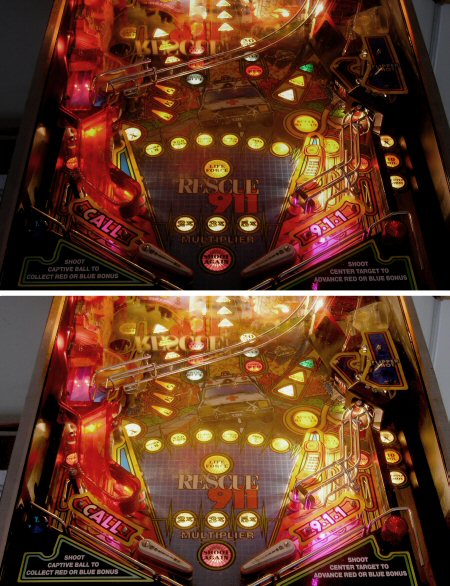 |
Gamma lets you make dim areas brighter, without affecting brighter portions. The clip at the top is as shot, and the bottom is after increasing the gamma. If the overall brightness was increased, the playfield lights would have become washed out and overly bright, obliterating the text. |
Smudge Brush
After gamma, this is one of the most powerful editing tools I use. It can erase white specs on clothing, and remove all sorts of blemishes large and small. Unlike a Paintbrush tool that paints an area one solid color, the Smudge Brush copies parts of an image and drags them on top of adjacent areas. It's literally like using your finger to smudge an oil painting before the paint dries. You can use it to hide creases in clothing, plus all sorts of other cool tricks such as extending someone's hairline forward as shown below. In this photo I also used the smudge brush to erase part of the graffiti. I erased only part, and did it imperfectly on purpose, so you can see how the blue background texture is mostly maintained.
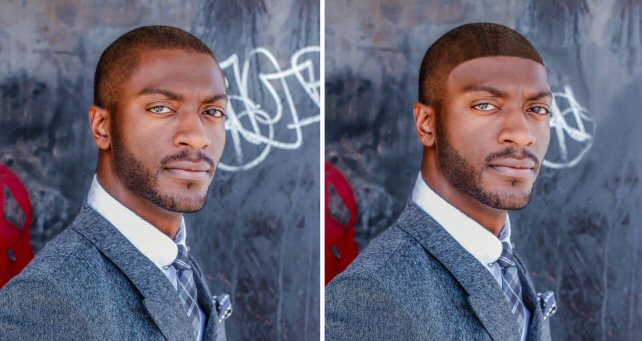 |
The Smudge Brush copies parts of an image to adjacent areas. In this example I moved the man's hairline forward, and erased part of the graffiti. |
Color Correction
Most photo editing programs provide extensive adjustments for altering the colors in a photo. But often all you need is a simple Color Temperature control to remove a red or orange tint, or to make a photograph "warmer" or "cooler" looking.
 |
This simple color balance control lets you reduce the reddish hue common on photos made without professional bright white lighting. Simply move the slider toward Blue. |
Automatic White Balance
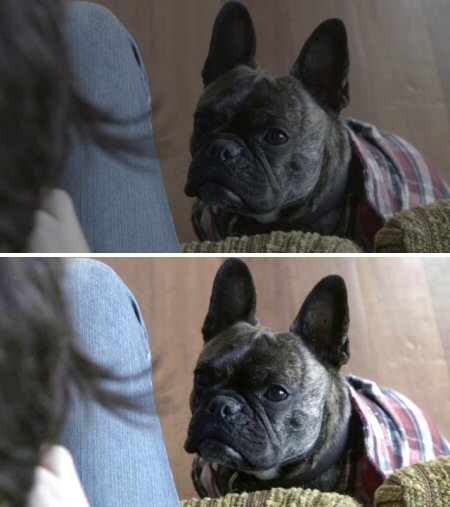
Another very useful color correction tool can automatically correct all colors at once without fussing with red / green / blue levels manually. You simply point to an area of the photo that was supposed to be white, and the software adjusts all colors at once to make that happen. In the example below I selected the wall on the right as the white reference in the upper photo, and the software adjusted all of the colors as needed to create the lower image. Nice!
 |
Automatic white balance is extremely powerful - and easy to use! Simply point to an area that was supposed to be white, and your photo editor program does the rest. |
Sizing Photos
As part of my acoustics work I receive dozens of photos by email every week, and I need to save most of them for several months or more. I routinely reduce the 4 MB photos I receive down to 50 KB with no practical loss of quality. If I didn't do that I'd be backing up 5 GB of data instead of a few hundred MB. Besides reducing disk storage and cell phone data usage, shrinking photos to a more reasonable size lets you send and receive them by email much more quickly. The first step is to reduce the physical size of the image on screen. Reducing the width to 600-800 pixels leaves most photos large enough to still see everything clearly. Then you'll set the amount of compression when you save the photo as a JPG file.
 |
Any competent photo editor program will let you change the size of an image either by a percentage amount, or to specific pixel dimensions as shown here. |
Most photos are saved as JPG images. The JPG format uses lossy compression to reduce the size of the file. In this case "lossy" means that some of the information is discarded and lost forever. JPG compression is meant for use with photos because the data loss isn't usually obvious unless the file is overly compressed. But JPG is not a good format for line art and other drawings, as you can see in the keyboard images below. The top image is the original as saved in the GIF format, and the lower image is after saving again as a JPG file. You can clearly see dots and smudges around the text and lines. So I always use GIF or PNG for line drawings and text, and I show this example just so you can see what JPG artifacts look like and learn to recognize them. (Note that GIF files are not only for little videos. Animated GIFs are just an extension of the original GIF format.)
 |
JPG images use lossy compression that creates dots and smudges around edges. |
When you save a photograph in the JPG format, a good program will let you select the compression amount to balance image quality with file size. In the screen below, as you vary the compression amount the resulting compressed file size is updated at the upper right.
 |
When saving a JPG file, better photo editing programs let you set the amount of lossy compression to balance file size with image quality. |
For photos I care about and plan to keep I save the full size image as a PNG file. This lets me come back later and tweak the editing further if needed on the PNG file, then save it again in a reduced size for emailing or posting online. If you load a JPG file then save it again, the artifacts will become even worse. PNG files are not degraded by lossy compression as are JPG files, so you can edit and save them again and again, though PNG files are much larger than JPGs.
I can't describe all the features of modern photo editing software, but these few starting tips should help you produce much better photos. Even the basic free programs include more features than are described in this brief overview. Of course, as with any endeavor, the more effort you put into learning something, the more successful you will be. However, I hope you'll find that basic photo editing as described here is not difficult once you try it!
Ethan Winer has been an audio engineer and professional musician for more than 45 years, and is a principle at RealTraps where he designs acoustic treatment products for recording studios and home listening rooms. Ethan's Cello Rondo music video has received nearly 2 Million views on YouTube and other web sites, and his book The Audio Expert published by Focal Press is available at amazon.com and his own web site.
Entire contents of this web site Copyright © 1997- by Ethan Winer. All rights reserved.